
Arid lands passive acoustic monitoring of biodiversity
KEY DETAILS
- Principal Investigator
- Dr. Lucy Smyth
Date - 19 October 2024
Version - 0.1.2
Programme - Arid Biodiversity Programme
Study Site - ORKCA
Key partners - ORKCA Contact email
- lsmyth@naturalstate.org
1. PREAMBLE
Natural State’s objectives and activities are detailed by a set of accepted Standard Operating Procedures (SOPs). These documents describe the steps involved in all Natural State projects, from data collection to data processing and storage. Each SOP documents key project details and provides methodological details specific to the project. The objectives and background of the project, features of the study area, and details on survey and sampling design may be found in the project Design Document (DD) which is available in the Related Documents section below.
1.1 SOP PURPOSE
To provide a clear step by step guide to the methods implemented in the project, therefore allowing for consistency in data collection and repeatability of all steps involved in a project’s data collection, processing and storage. This is crucial to Natural State’s mission of facilitating nature restoration at scale by using the latest technology and methods to revolutionise impact monitoring for carbon, biodiversity and human well-being.
1.2 SOP SCOPE
This document details how this project will be implemented. All methodological steps are explained, and the principal team members overseeing the project are listed in case further clarification is required. It also further directs readers to where they can find additional information relevant to the project. This document is intended to be printed out and taken to the field for reference sake.
2. GLOSSARY
- Acoustic Monitor
- a passive acoustic recording device.
- Ambient Noise
- Regular (continuous or intermittent) non-target noises that may obscure the target sounds. Common Ambient noises include wind, running water, vehicles, people’s voices and construction.
- Band Filter
- Subset frequencies to be recorded. For example, it may be practical to filter out all frequencies more than half the sampling rate.
- Deployment
- The period of time a single remote sensor is active within the environment at a single, defined station as part of a survey.
- Deployment Group
- Temporally distinct sets of geographically or thematically grouped and contemporaneous (e.g., seasonal deployment groups).
- Fixed Detectors
- Deployments of sampling devices that are placed at a specific, pre-defined sampling location.
- Float Detectors
- Deployments of sampling devices that are placed at locations largely at the discretion of the field team to maximize detection probabilities for animals that use the surrounding habitat.
- Frequency
- The number of times per second that a sound pressure wave repeats itself. Frequency is measured in Hertz (Hz) or, more often, in kilohertz (kHz). Most bird calls are between 0 and 16 kHz.
- Gain
- In a receiving antenna, the gain describes how well the antenna converts radio waves arriving from a specified direction into electrical power. It is basically a measure of sensitivity; the higher the gain the more likely the sensor is to detect a signal (e.g., bird call) but the more background noise is generated.
- Project
- A concerted, data-driven effort to robustly measure variation in Biodiversity, Carbon, or Human-wellbeing in response to one or more sources of heterogeneity in a designated landscape.
- Recording Cycle
- The combined duration (usually measured in seconds) of one recording period and one sleep period. For example, if a recording period is 3570 seconds and a sleep period is 30 seconds, then the recording cycle is 3600 seconds.
- Recording Duration
- A defined duration measured in seconds during which a device is actively recording during the recording period. The recording duration defines the duration of each individual audio file.
- Recording Periods
- Defined periods of a 24-hour day during which the recorder operates recording cycles. The recording periods must be set in UTC.
- Remote Sensor
- An electronic sensor with automated data collecting capabilities that operate independently of a human handler.
- S123
- Survey123, a field-data collection app from ESRI which NS uses for recording all field observations and survey metadata.
- Sampling Design
- The set of field methods employed in a survey and the manner of their use.
- Sampling Features
- Physical fine-scale characteristics of the landscape that correlate with animal movement and space use such that detection within a used habitat patch is assumed to be greater on or near such features than away from them.
- Sampling Protocol
- Explicit survey methodology that describes the design, effort, duration, configuration, and operation of a survey.
- Sampling Rate
- The sampling rate is how rapidly continuous sound is discretized during digitization. It’s equivalent to the frames-per-second rate in video. The sample rate must be at least double the highest frequency you want to record. For example, in order to record sounds up to 20 kHz, a sample rate of at least 40 kHz is required.
- Sampling Site
- A distinct, discrete spatial unit defined in at least two dimensions where sampling occurs.
- Sleep Duration
- A defined duration measured in seconds during which a device does not record sounds. The sleep duration must be less than the recording period.
- Sampling Station
- A point location where sampling occurs in space.
3. PROJECT OVERVIEW
3.1 PROJECT AIMS
The passive acoustic monitoring of biodiversity project aims to:
- Non-invasively collect observations of bird species across habitat types and management regimes.
- Non-invasively collect audio recordings of other vocal species such as invertebrates and mammals across habitat types or gradients and management regimes.
- Non-invasively collect soundscape recordings across habitat types or gradients and management regimes.
- Collect audio recordings of domestic animals such as sheep to measure their activity across habitat types and management regimes.
3.2 PROJECT BACKGROUND
Natural State’s mission is to catalyse large-scale restoration globally by revolutionizing impact monitoring, developing new financial mechanisms and supporting local changemakers. As part of this, NATURAL STATE aims to develop and optimise impact monitoring systems to reduce costs and provide independently verifiable results on interventions.
Passive monitoring of biological communities is a staple of long-term and large-scale ecological monitoring. Passive monitoring, deploying remote sensors continuously or intermittently to gather information about the landscape, tends to be less invasive and less resource-intensive than most active monitoring approaches (e.g., animal tracking, direct counts) and thus offers much lower costs to scale. The emergence of highly accurate machine-learning classifiers for passively collected data has amplified the scalability and effectiveness of passive monitoring.
Bioacoustics offer especially pronounced benefits because they can be used to monitor such a wide range of taxa from insects to whales, because they are applicable in nearly every biome, and because animal vocalizations have evolved to project through space meaning that signals can be detected at greater distances than many other passive methods. Unlike visual cues, bioacoustics are not impeded by dense vegetation. For these reasons, bioacoustics are among the fastest developing and most promising methods for large-scale ecological monitoring.
3.3 STUDY AREA
ORKCA The ORKCA landscape is located at joining point of the Succulent Karoo, Nama Karoo and Desert biomes, just north of the Orange River.
3.4 PROJECT TIMELINE
- In September 2024, 36 AudioMoths will be deployed for the Arid BioCredit Pilot Project. 12 devices will be placed on each of the following 3 farms: Eendoorn, Keimas Remainder, Pelgrimsrust.
4. DEPLOYMENT
NB: Ensure that landownders and managers have been notified of the planned fieldwork in advance.
4.1 SAMPLING PREPARATION
These steps need to happen in the office, while connected to wifi, before going to the field.
AudioMoth Firmware Update and Configuration 1) First insert a formatted SD card and 3 batteries into each AudioMoth. 2) Connect AudioMoth to laptop using a micro USB cable. 3) Open the AudioMoth-Flash App and update firmware. 4) Open the AudioMoth-Time App and set the date and time to UTC. 5) Open the AudioMoth-Config App and set the the settings as shown below. 6) Eject AudioMoth before disconnecting the cable.
Recording Tab | Setting | Selection | | ——- | ——— | | Sample Rate (kHz) | 48 kHz | | Gain | Medium – Low (second from the left) | | Enable sleep/record cyclic cording | yes | | Sleep Duration (s) | 00:00:30 | | Recording duration (s) | 00:59:30 | | Enable LED | yes | | Enable battery level indication | yes | | Use NiMH/LiPo voltage range for battery level indication | no | | Band filter | None | | Trigger type | None |
Schedule Tab | Setting | Selection | | ——- | ——— | | Recording Periods | 00:00 – 08:00 UTC AND 12:00 – 21:00 UTC |
Filtering Tab | Setting | Selection | | ——- | ——— | | Trigger Type | None | | Filter Type | None |
Advanced Tab No boxes checked
Example | Recording | Schedule | | ——- | ——— | | 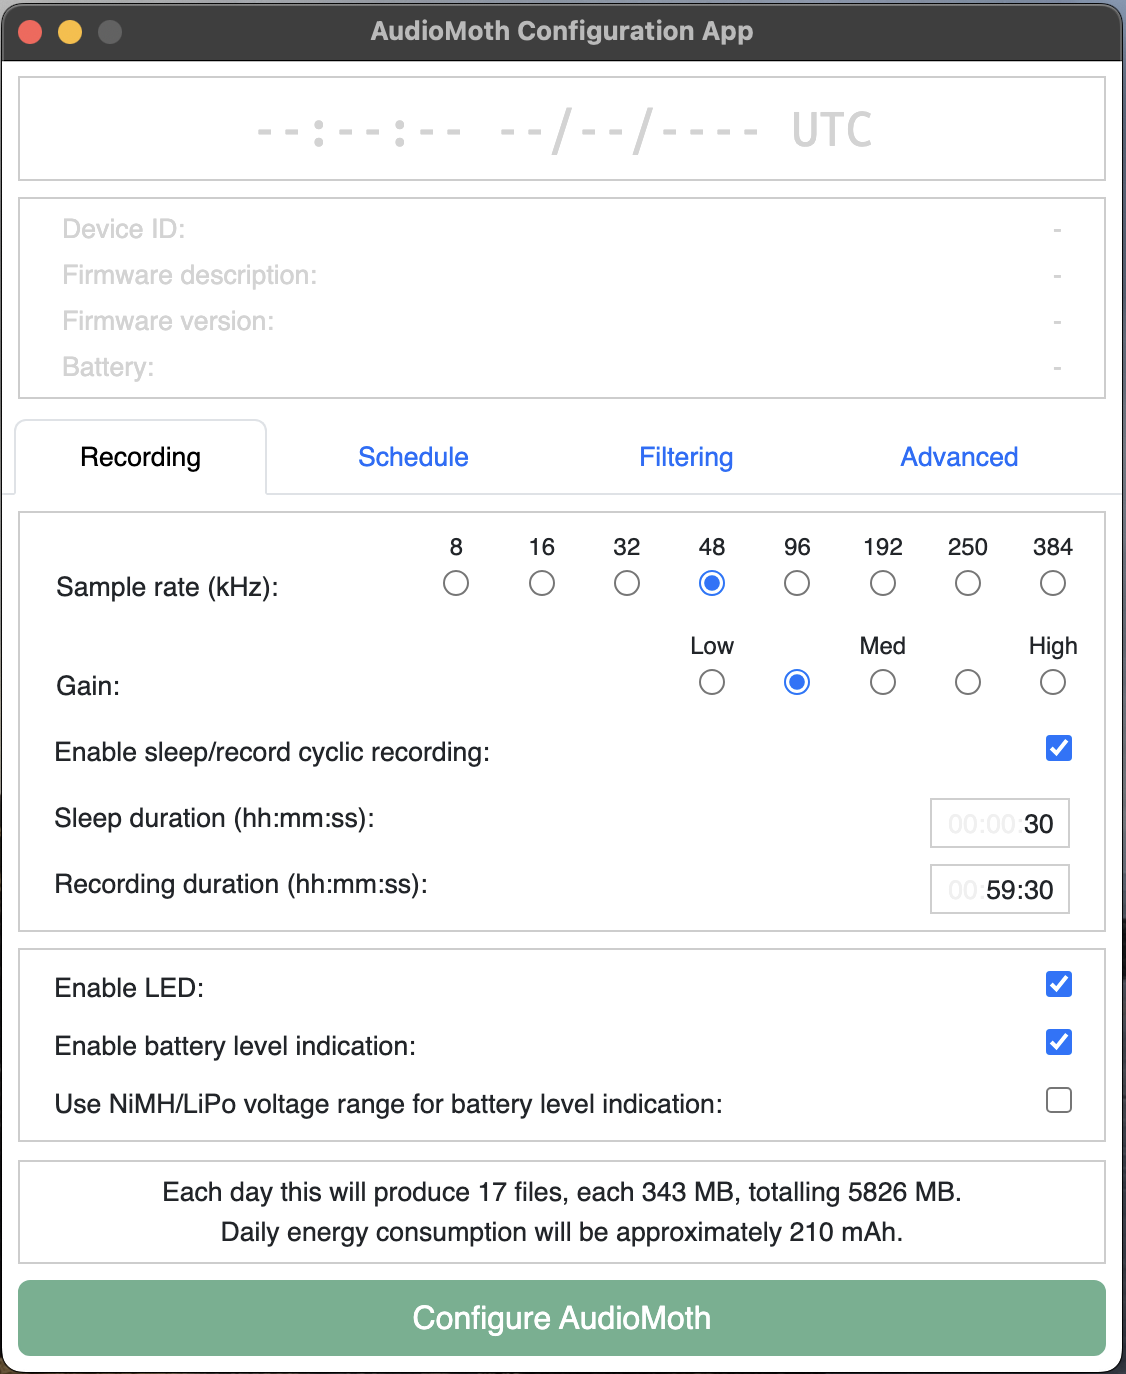 |
| 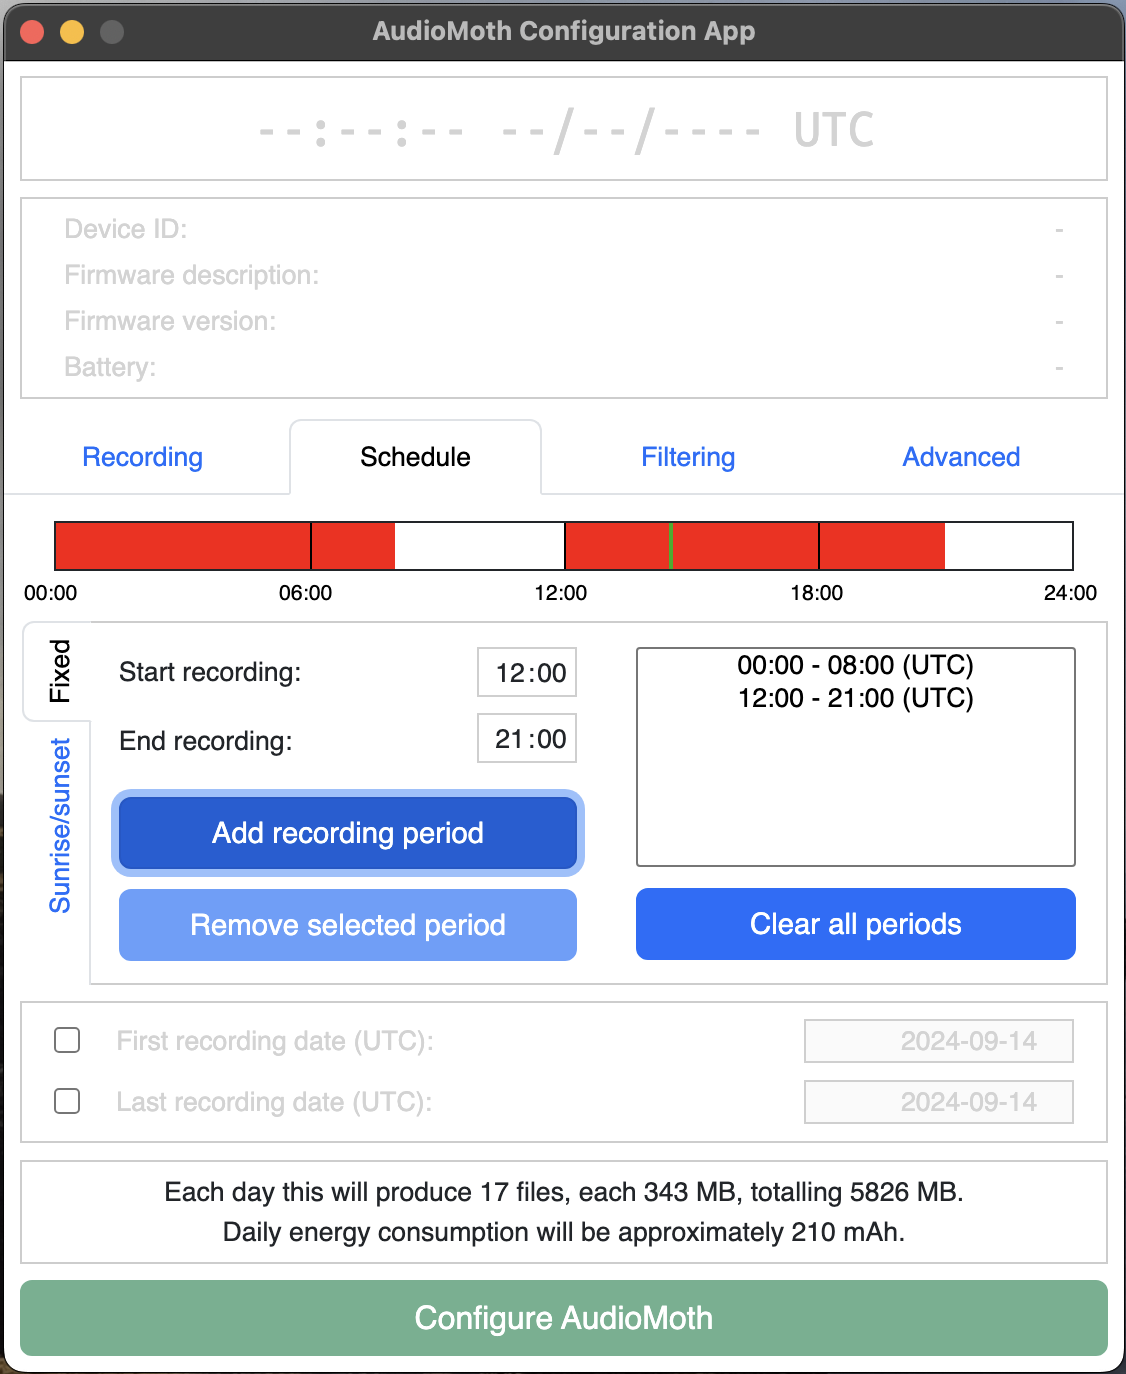 |
|
| Filtering | Advanced |
|---|---|
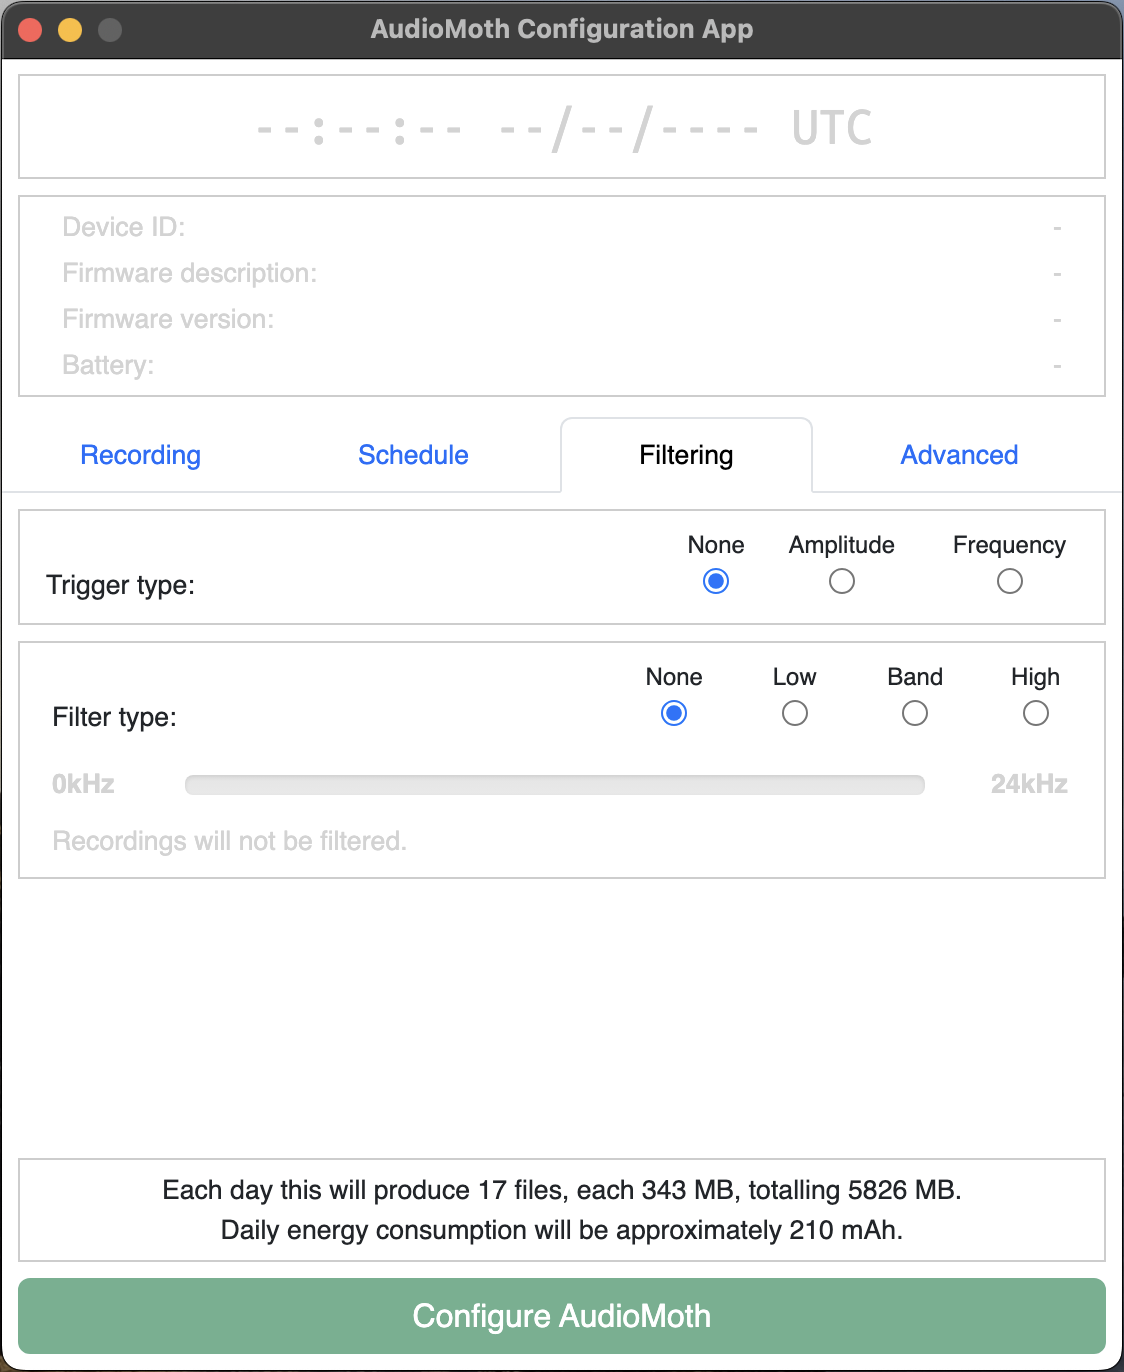 | 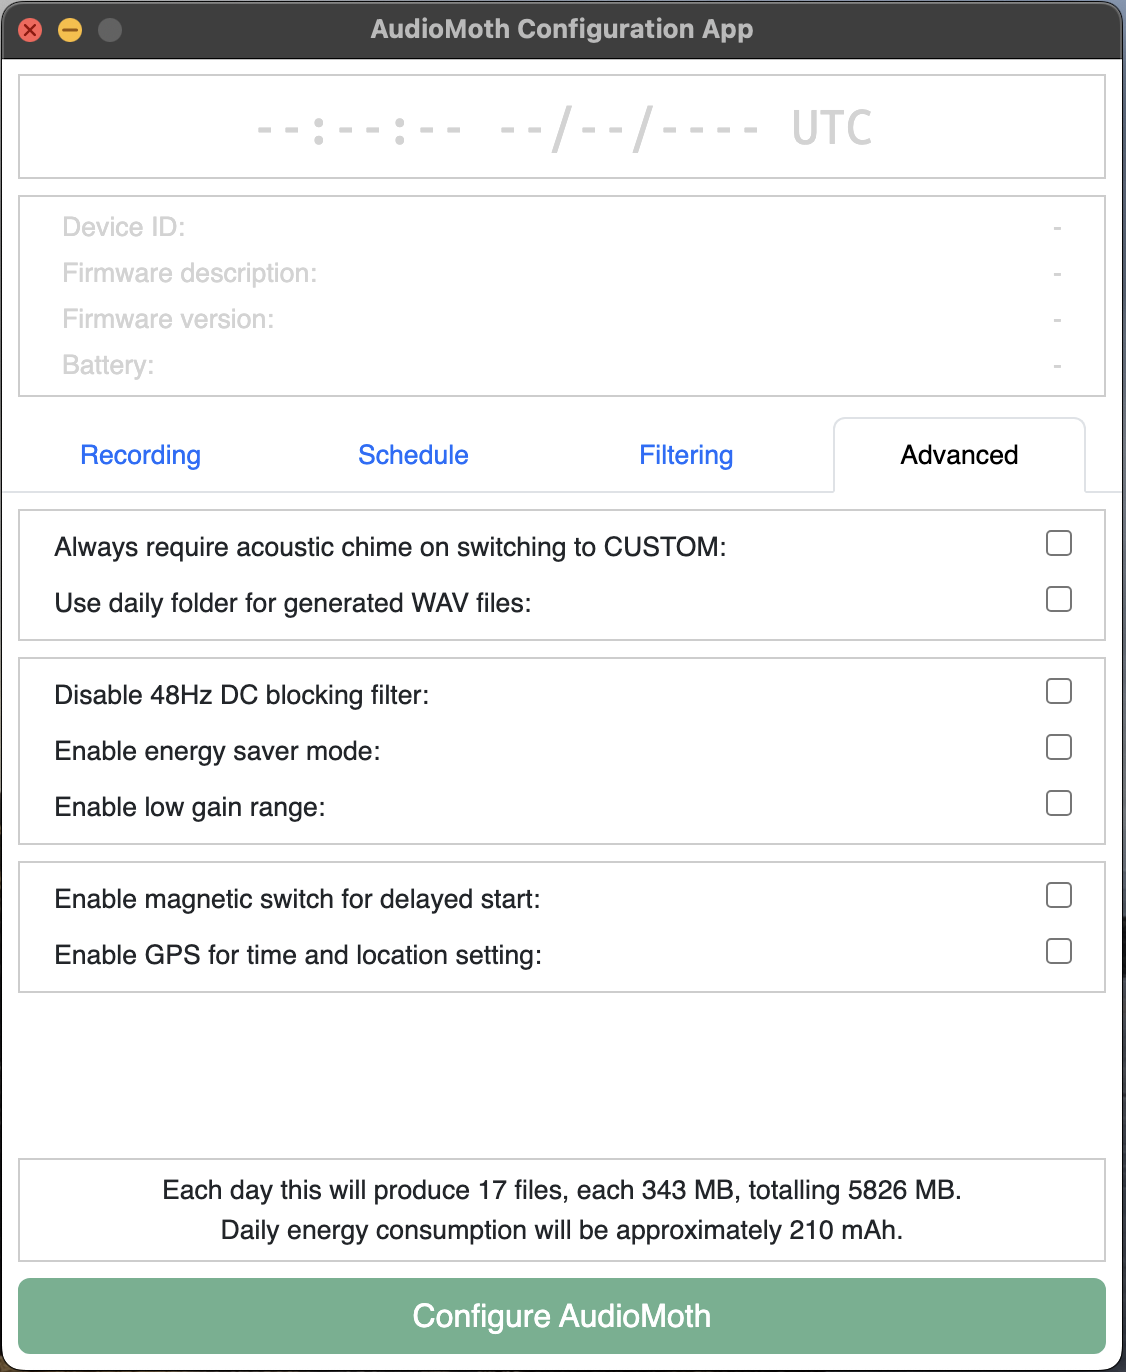 |
Equipment List: Pack the car
- AudioMoths: Bring 1 per station plus 3 extras. Each AudioMoth must be tagged with a QR code for scanning into S123. Devices must be programmed with the latest firmware (Flash App), have batteries and an SD card (SanDisk Extreme 64GB) inserted and must have the date & time (Time App) and configuration settings (Configuration App) as documneted in the configuration section below. Each Audiomoth should be secured in a casing with a velcro strap.
- Handheld GPS with spare Eneloop Pro batteries and preloaded with coordinates of prospective sites.
- Mobile device (phone or tablet): fully charged, preloaded with the S123 app and Acoustic Survey form.
- Laptop: fully charged, in case you need to re-configure settings in the field.
- Micro USB cable for connecting AudioMoths to laptop if necessary.
- Metal poles >1m long for holding AudioMoths.
- Mallet for hammering poles into the ground.
- Water and a medical kit in the vehicle.
4.2 SAMPLING PROCEDURES
The field team should arrive at the sampling site and note their surroundings. This includes discussing any features that occur within 100m of the sampling site as well as any sources of ambient noise that that can be heard.
Acoustic Monitor Placement Each AudioMoth is assumed to have a detection radius for most bird species of 100m. AudioMoths should always be placed at least 250 m apart to minimize the overlap in sampling areas.
AudioMoths should be placed on a tree or pole above a camera trap deployed at the same station. Ideally AudioMoths should be placed at a height of 1.2m, but in cases where no trees are present and the pole is not this tall the device can be placed as high as possible on the pole, above the camera trap. AudioMoths should not be placed in depressions or against cliff faces, but on the edge at the top of a cliff is suitable. They should also not be placed near ambient noise. This means avoid placing them near running water, busy roads, or construction. If the wind typically blows from a particular direction, AudioMoths should be placed on the leeward (i.e., downwind) side of trees and bushes.
The deployment location of an AudioMoth is always defined as a station, even when it is located within a sampling site.
Acoustic Monitor Setup 1) Navigate to the relevant sampling site using a handheld GPS with coordinates of prospective sites loaded. 2) Stand at the station coordinates and locate the best place to deploy the AudioMoth, within a 100m radius of the sampling site. 3) If no appropriate tree is present, hammer a pole into the ground deep enough that it is solidly anchored and will not be pushed over. 4) Take a GPS coordinate of this station on your handheld GPS. 5) Open the Acoustic S123 Form and begin capturing the required information. 6) Select an AudioMoth and scan the barcode into S123. 7) Remove the SD card and scan its barcode into S123 before re-inserting into the AudioMoth. Do not remove batteries or time and settings will be lost 8) Set the mode from USB/Off to Custom. On the opposite side to where you inserted the micro SD card, some lights will start flashing. These tell you the status of the device:
- A flashing red light indicates the device is recording successfully.
- A flashing green light indicates the device is sleeepling (current time falls outside the configured recording period)
- Flashing green and red lights mean the device has a problem and should be reconfigured or replaced. 9) If the device is working properly, close the AudioMoth container around the device, making sure that the clip is properly fastened and the AudioMoth microphone is lined up with the hole in the case. 10) Firmly attach the AudioMoth to a tree or pole with its velcro strap such that the microphone hole is angled parallel to the slope of the terrain. 12) Finish recording details of the AudioMoth deployment in S123. Ensure the location is recorded within 2m of the AudioMoth. 13) Speak clearly near the AudioMoth to record the date, time, and station number.
4.3 POST-PROCESSING
Upon the completeion of an acoustic survey deployment, save GPX file with actual station coordinates to Teams.
5. CHECK
NB: Ensure that landownders and managers have been notified of the planned fieldwork in advance.
5.1 SAMPLING PREPARATION
These steps need to happen in the office, before going to the field.
Equipment List: Pack the car
- AudioMoths: Bring 3 extras. Each AudioMoth must be tagged with a QR code for scanning into S123. Devices must be programmed with the latest firmware (Flash App), have batteries and an SD card (SanDisk Extreme 64GB) inserted and must have the date & time (Time App) and configuration settings (Configuration App) as documneted in the configuration section below. Each Audiomoth should be secured in a casing with a velcro strap.
- SD Cards: SanDisk Extreme 64BG, pre-formatted. Bring 1 per station plus 3 extra. Put in clearly labelled box for clean SD cards.
- Box for full SD Cards: Clearly labelled.
- Batteries: Fully charged Eneloop Pro. Bring 3 per station that you will check plus 9 extra. Put in clearly labellled box for full batteries.
- Box for flat batteries: Clearly labelled.
- Handheld GPS with spare Eneloop Pro batteries and preloaded with coordinates of actual sites.
- Mobile device (phone or tablet): fully charged, preloaded with the S123 app and Acoustic Survey form.
- QR code representing missing device: stuck to your GPS or another obvious place that can be scanned when necessary.
- Laptop: fully charged, for configuring settings in the field.
- Micro USB cable for connecting AudioMoths to laptop.
- Metal poles >1m long for holding AudioMoths.
- Mallet for hammering poles into the ground.
- Water and a medical kit in the vehicle.
5.2 SAMPLING PROCEDURES
During checks you will need to reconfigure the setting on all AudioMoths after batteries and SD cards have been replced. The settings should be configured as follows:
AudioMoth Configuration 1) First insert a formatted SD card and 3 batteries into each AudioMoth. 2) Connect AudioMoth to laptop using a micro USB cable. 3) Open the AudioMoth-Time App and set the date and time to UTC. 4) Open the AudioMoth-Config App and set the the settings as shown below. 5) Eject AudioMoth before disconnecting the cable.
Recording Tab | Setting | Selection | | ——- | ——— | | Sample Rate (kHz) | 48 kHz | | Gain | Medium – Low (second from the left) | | Enable sleep/record cyclic cording | yes | | Sleep Duration (s) | 00:00:30 | | Recording duration (s) | 00:59:30 | | Enable LED | yes | | Enable battery level indication | yes | | Use NiMH/LiPo voltage range for battery level indication | no | | Band filter | None | | Trigger type | None |
Schedule Tab | Setting | Selection | | ——- | ——— | | Recording Periods | 00:00 – 08:00 UTC AND 12:00 – 21:00 UTC |
Filtering Tab | Setting | Selection | | ——- | ——— | | Trigger Type | None | | Filter Type | None |
Advanced Tab No boxes checked
Example | Recording | Schedule | | ——- | ——— | |  |
|  |
|
| Filtering | Advanced |
|---|---|
 |  |
Acoustic Monitor Check 1) Navigate to the relevant sampling station using a handheld GPS with actual station coordinates loaded. 2) Approach the AudioMoth, and speak clearly to is, stating the station number, date and time. 3) Undo to velcro to remove it from the tree or pole on which it was deployed and open the plastic casing. 4) Switch the AudioMoth to USB/off mode. 5) Open the Acoustic S123 Form and begin capturing the required information. 6) If the acoustic monitor is present and not broken then set activity as check. If the acoustic monitor is either missing or broken, set activity as retrieve. If the acoustic monitor is missing and you are filling out the retreive form, then scan the QR code that represents “missing device” in place of the missing acoustic monitor and SD card QR codes. If you are filling out the retrieve form then complete the rest of the form. Then start a new form, set activity as “deploy”, and use this form to install a new acousic monitor at the same location. If the acoustic monitor is present and not broken, continue with the following steps. 6) Remove the used SD card and place in a clearly labelled box. 7) Replace SD card with a new, formatted SD card from the office. 8) Remove the 3 Eneloop Pro batteries and place in a box clearly labelled to contain flat batteries. 9) Inset 3 fully changed Eneloop Pro batteries. 10) Connect AudioMoth to laptop using a micro USB cable. 11) Configure setings as described above. 12) Eject AudioMoth before disconnecting the cable. 13) Set the mode from USB/Off to Custom. On the opposite side to where you inserted the micro SD card, some lights will start flashing. These tell you the status of the device:
- A flashing red light indicates the device is recording successfully.
- A flashing green light indicates the device is sleeepling (current time falls outside the configured recording period)
- Flashing green and red lights mean the device has a problem and should be reconfigured or replaced. 14) If the device is working properly, close the AudioMoth container around the device, making sure that the clip is properly fastened and the AudioMoth microphone is lined up with the hole in the case. 15) Firmly attach the AudioMoth to a tree or pole with its velcro strap such that the microphone hole is angled parallel to the slope of the terrain. 16) Finish recording details of the AudioMoth check in S123. Ensure the location is recorded within 2m of the AudioMoth. 17) Speak clearly near the AudioMoth to record the date, time, and station number.
5.3 POST-PROCESSING
Within 7 days of the completion of an acoustic survey check, data must be uploaded to lakehouse (Natural State’s data storage platform) using Kutuma:
At office after check (no internet required) 1) Plug webcam into computer. 2) Plug hard drive into computer. 3) Open the kutuma application.  4) Login using your esri credentials. 5) Select Survey123, then your organization and your project. 6) Click on biodiversity.
 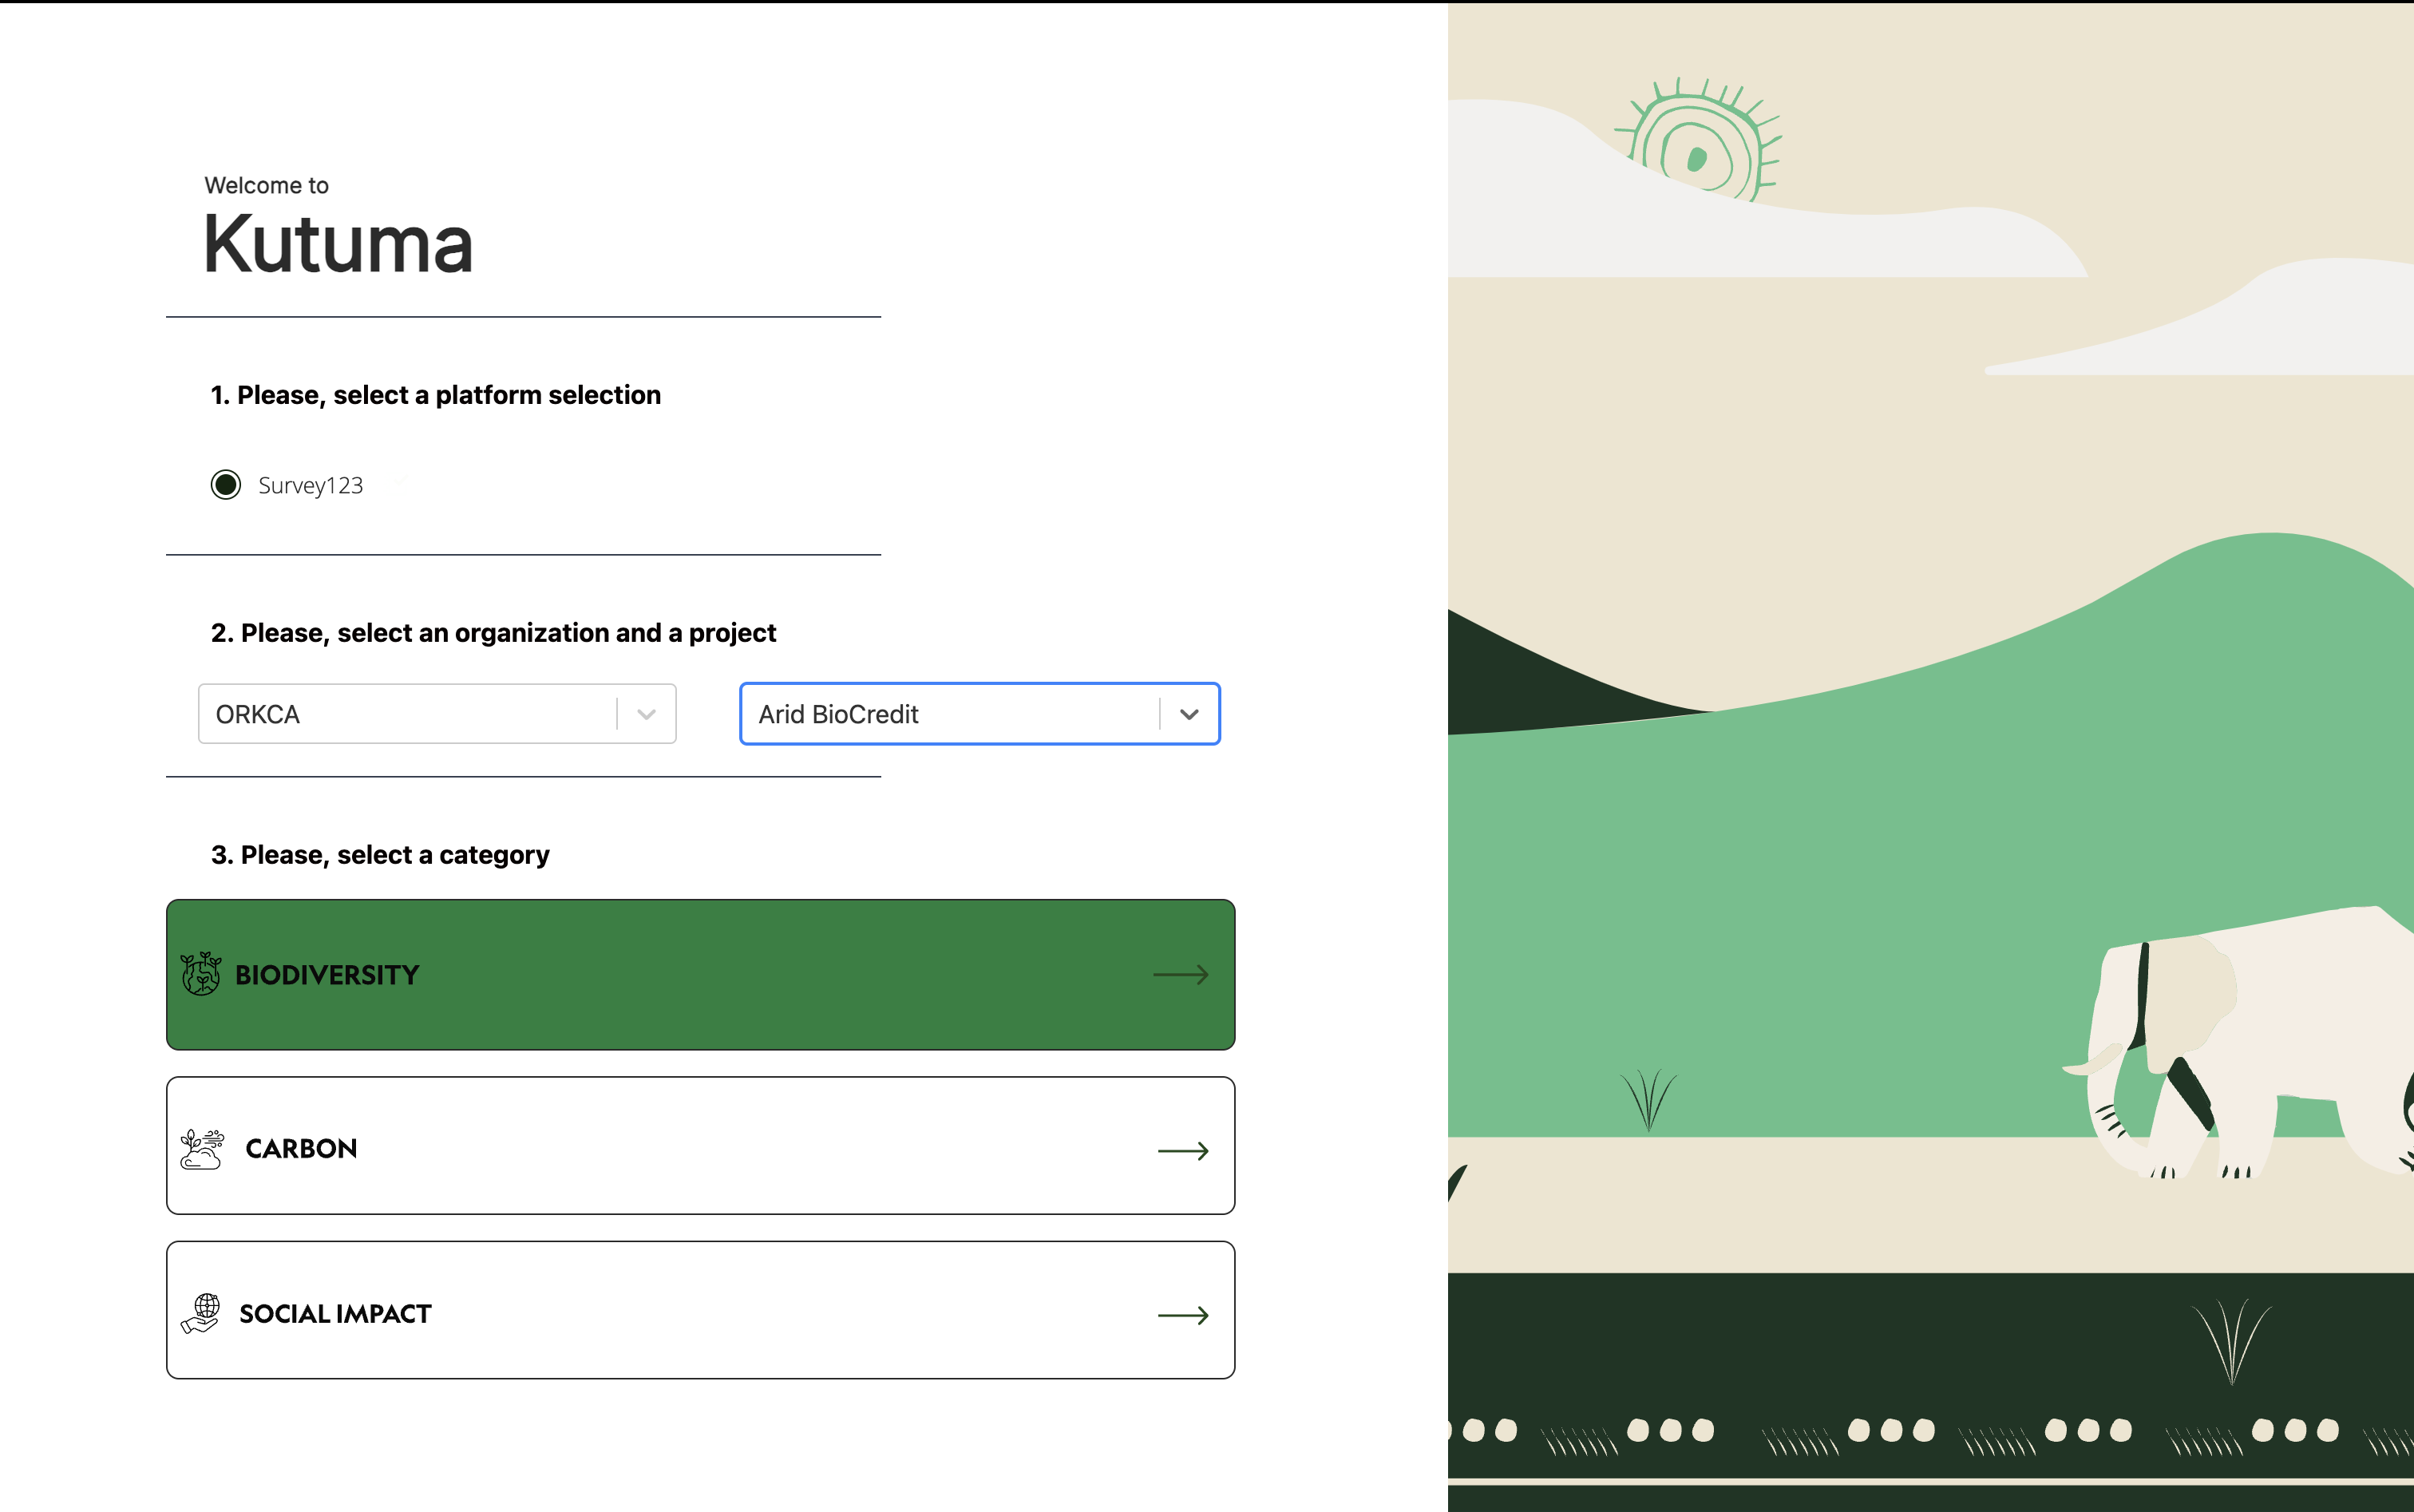 7) Click on settings in the bottom left corner. 8) Click on change storage location.
 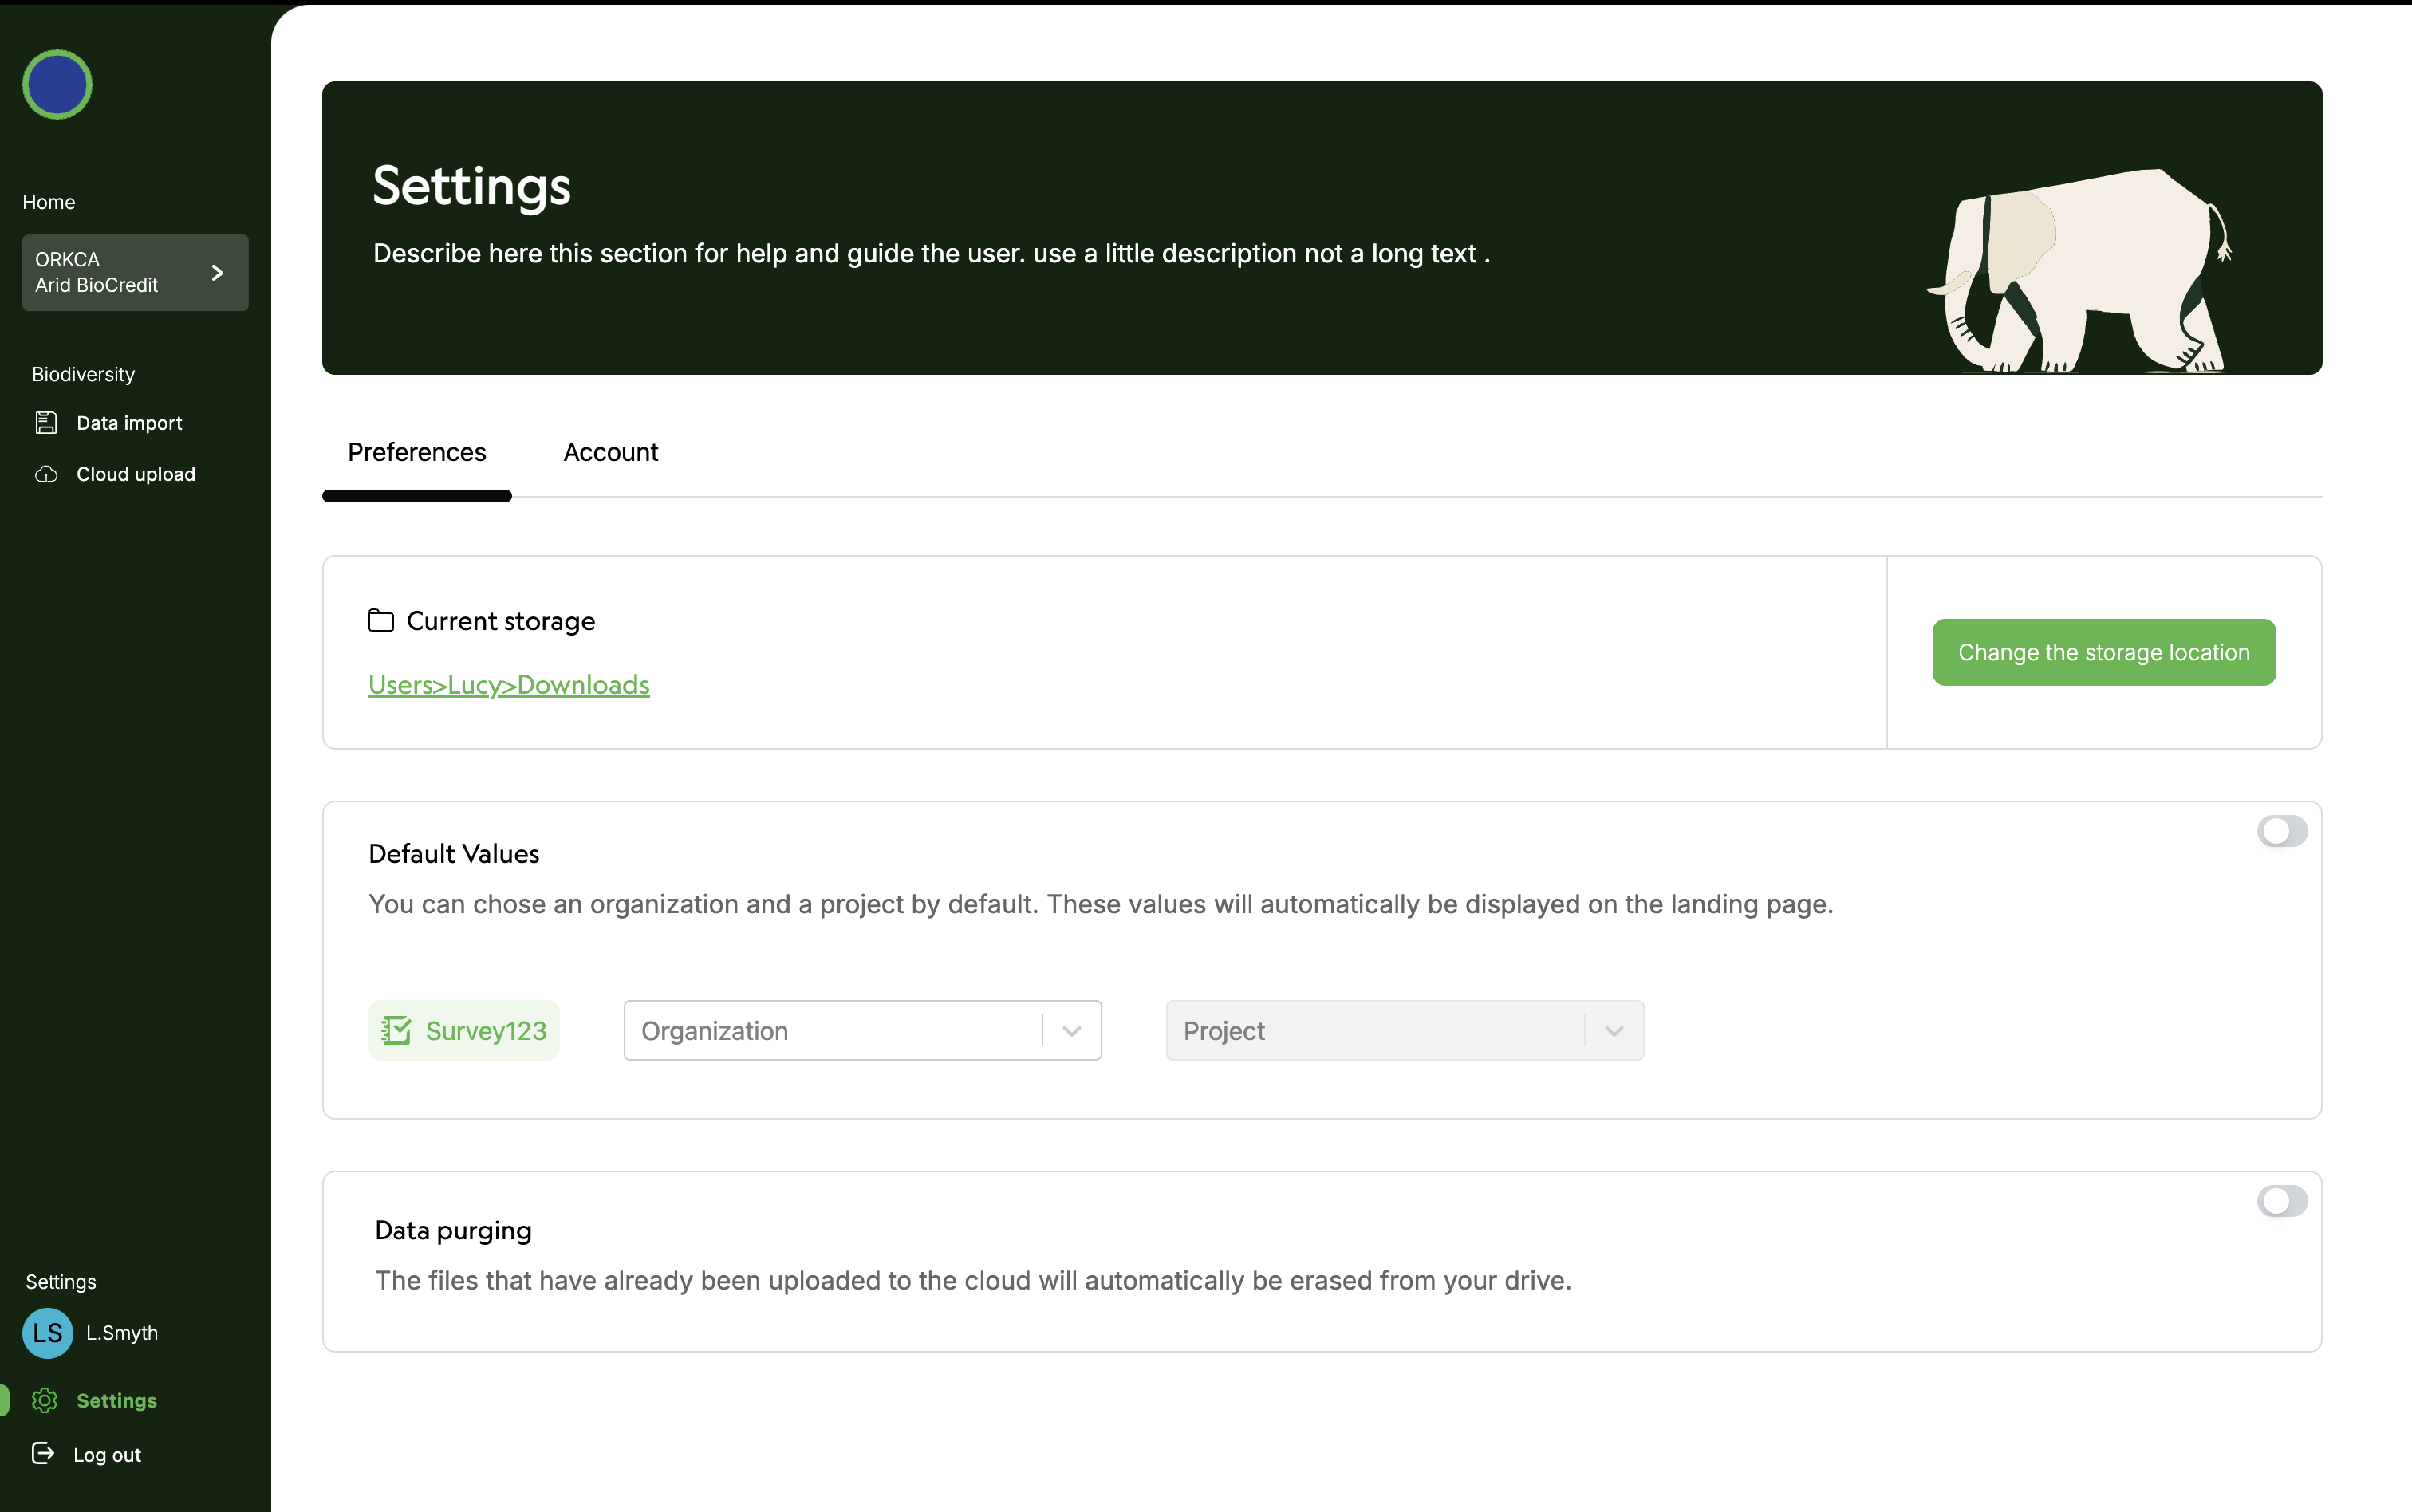 9) Select the hard drive where you would like to store your data. 10) Click on Data import under Biodiversity on left hand menu. 11) Scan QR code of SD card containing the data to upload.
 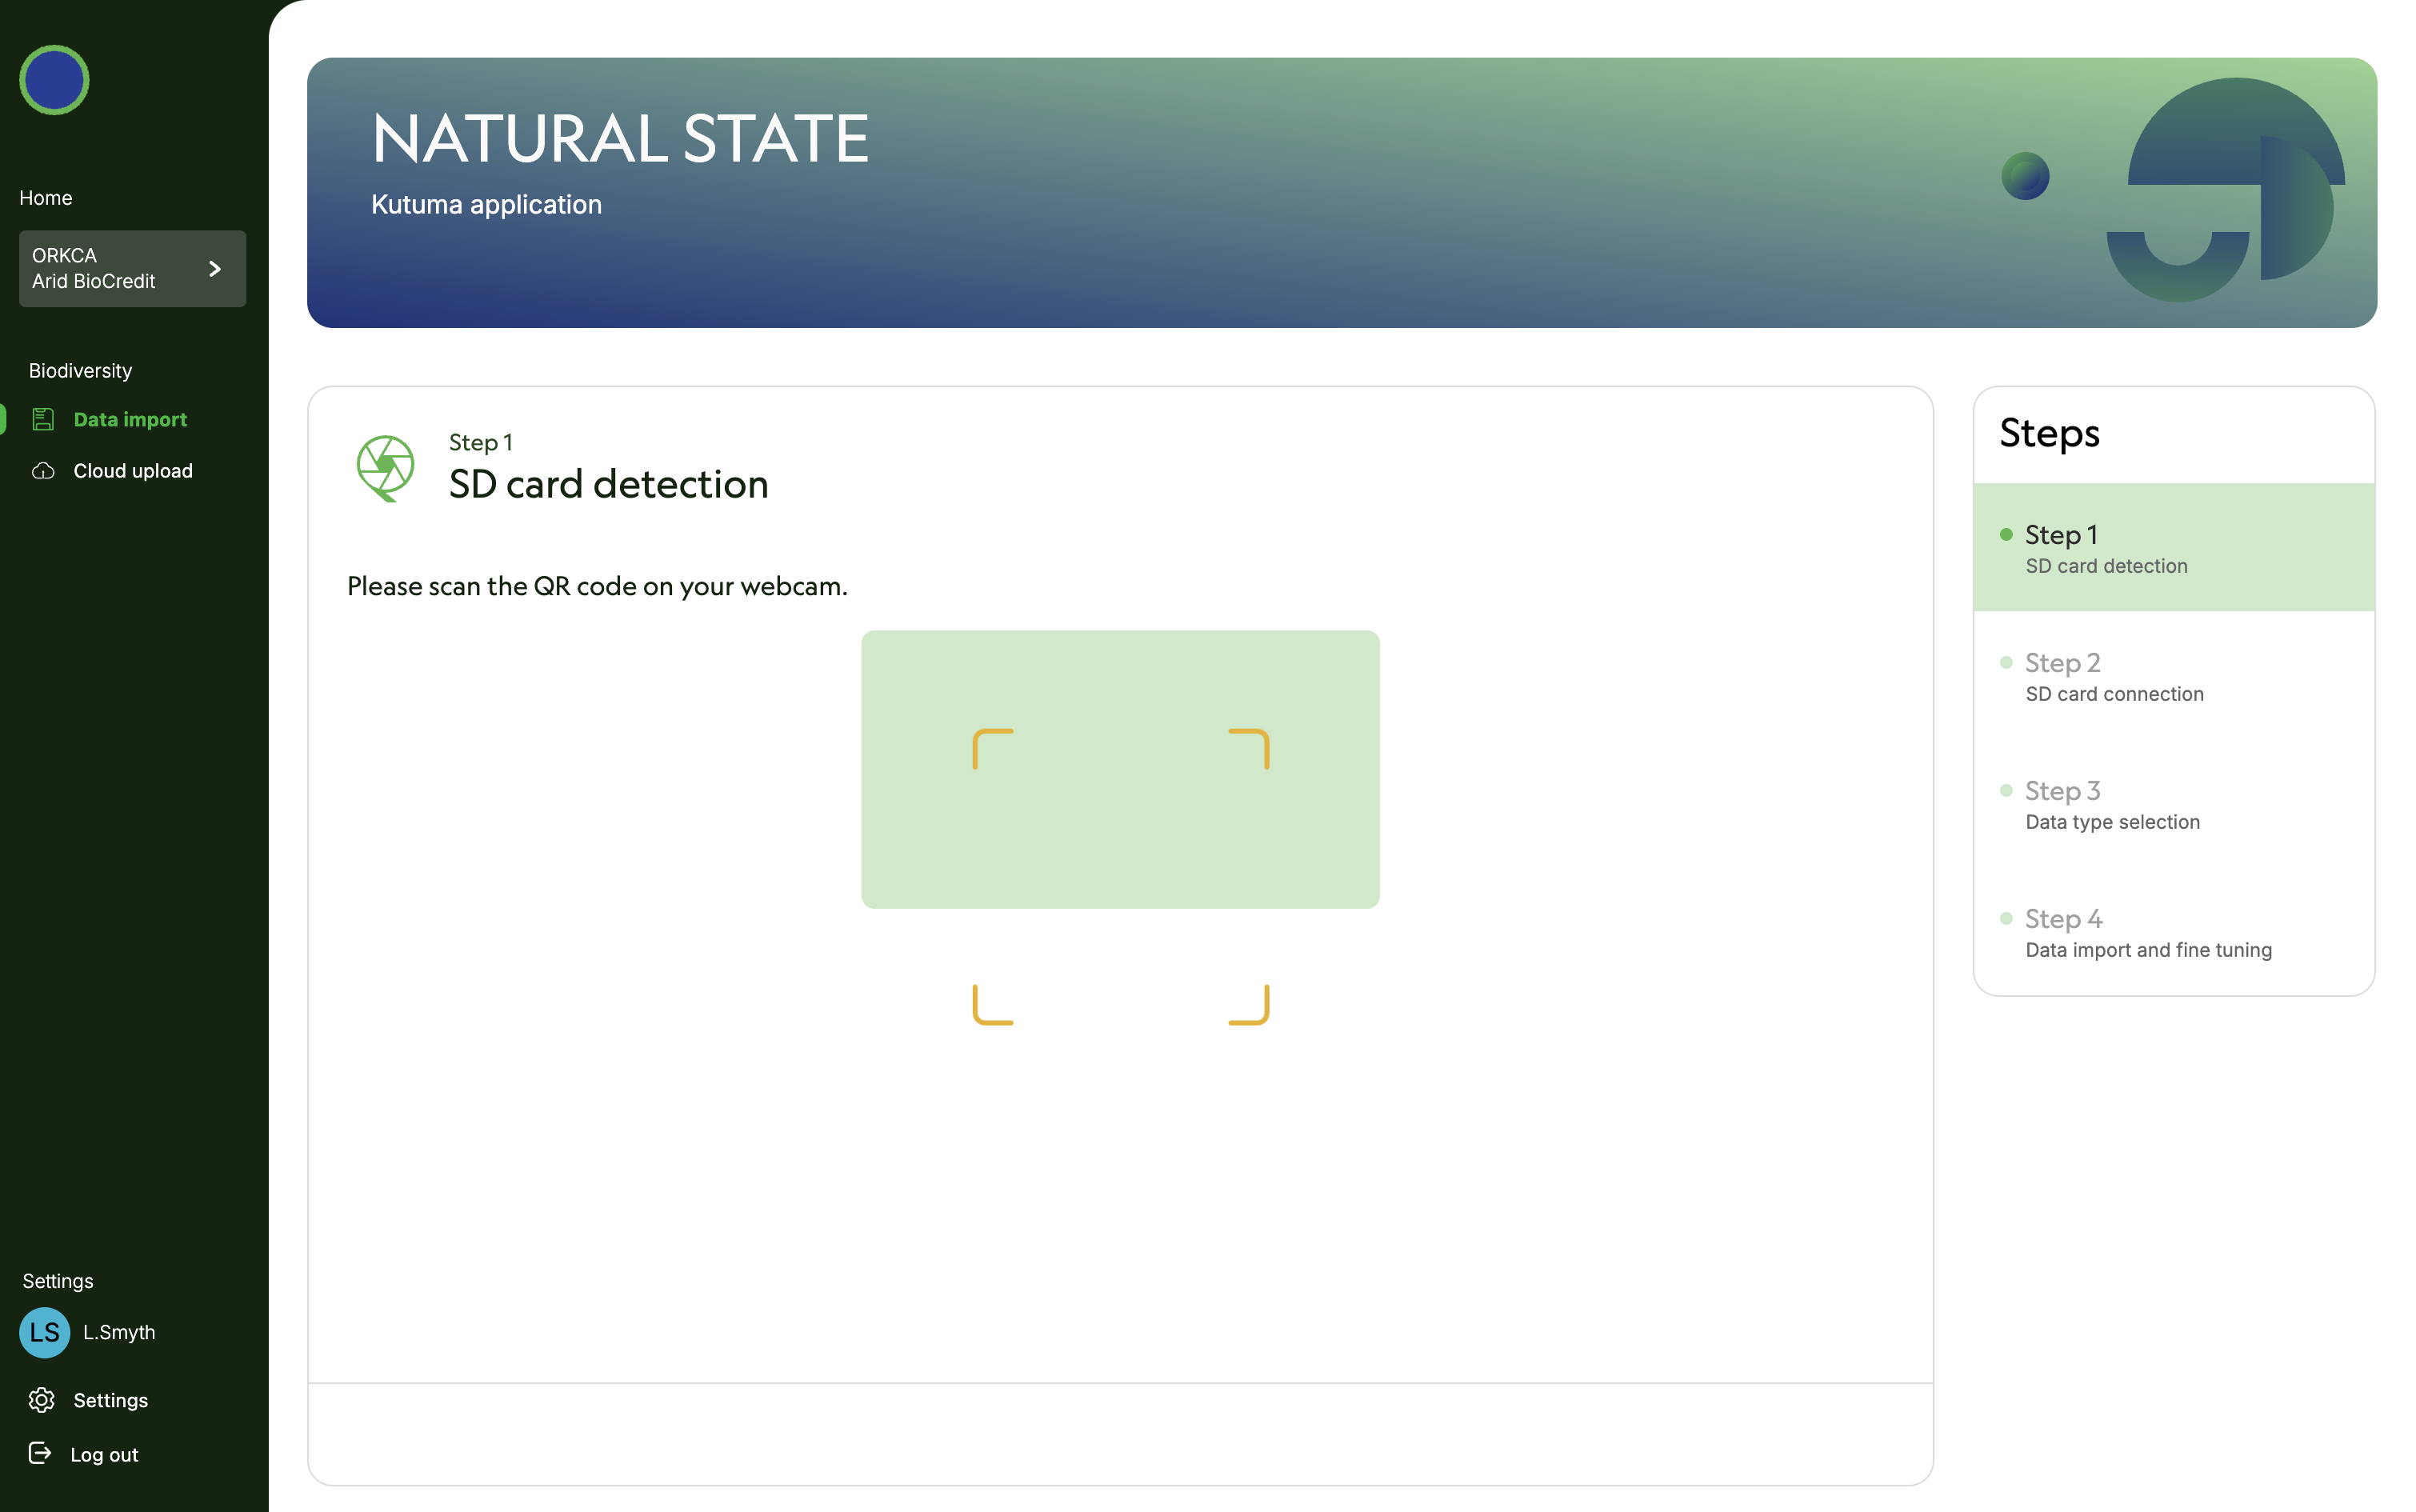 12) Plug SD card into computer. Computer must read SD card to proceed. 13) Specify that SD card is unencrypted. Click next.
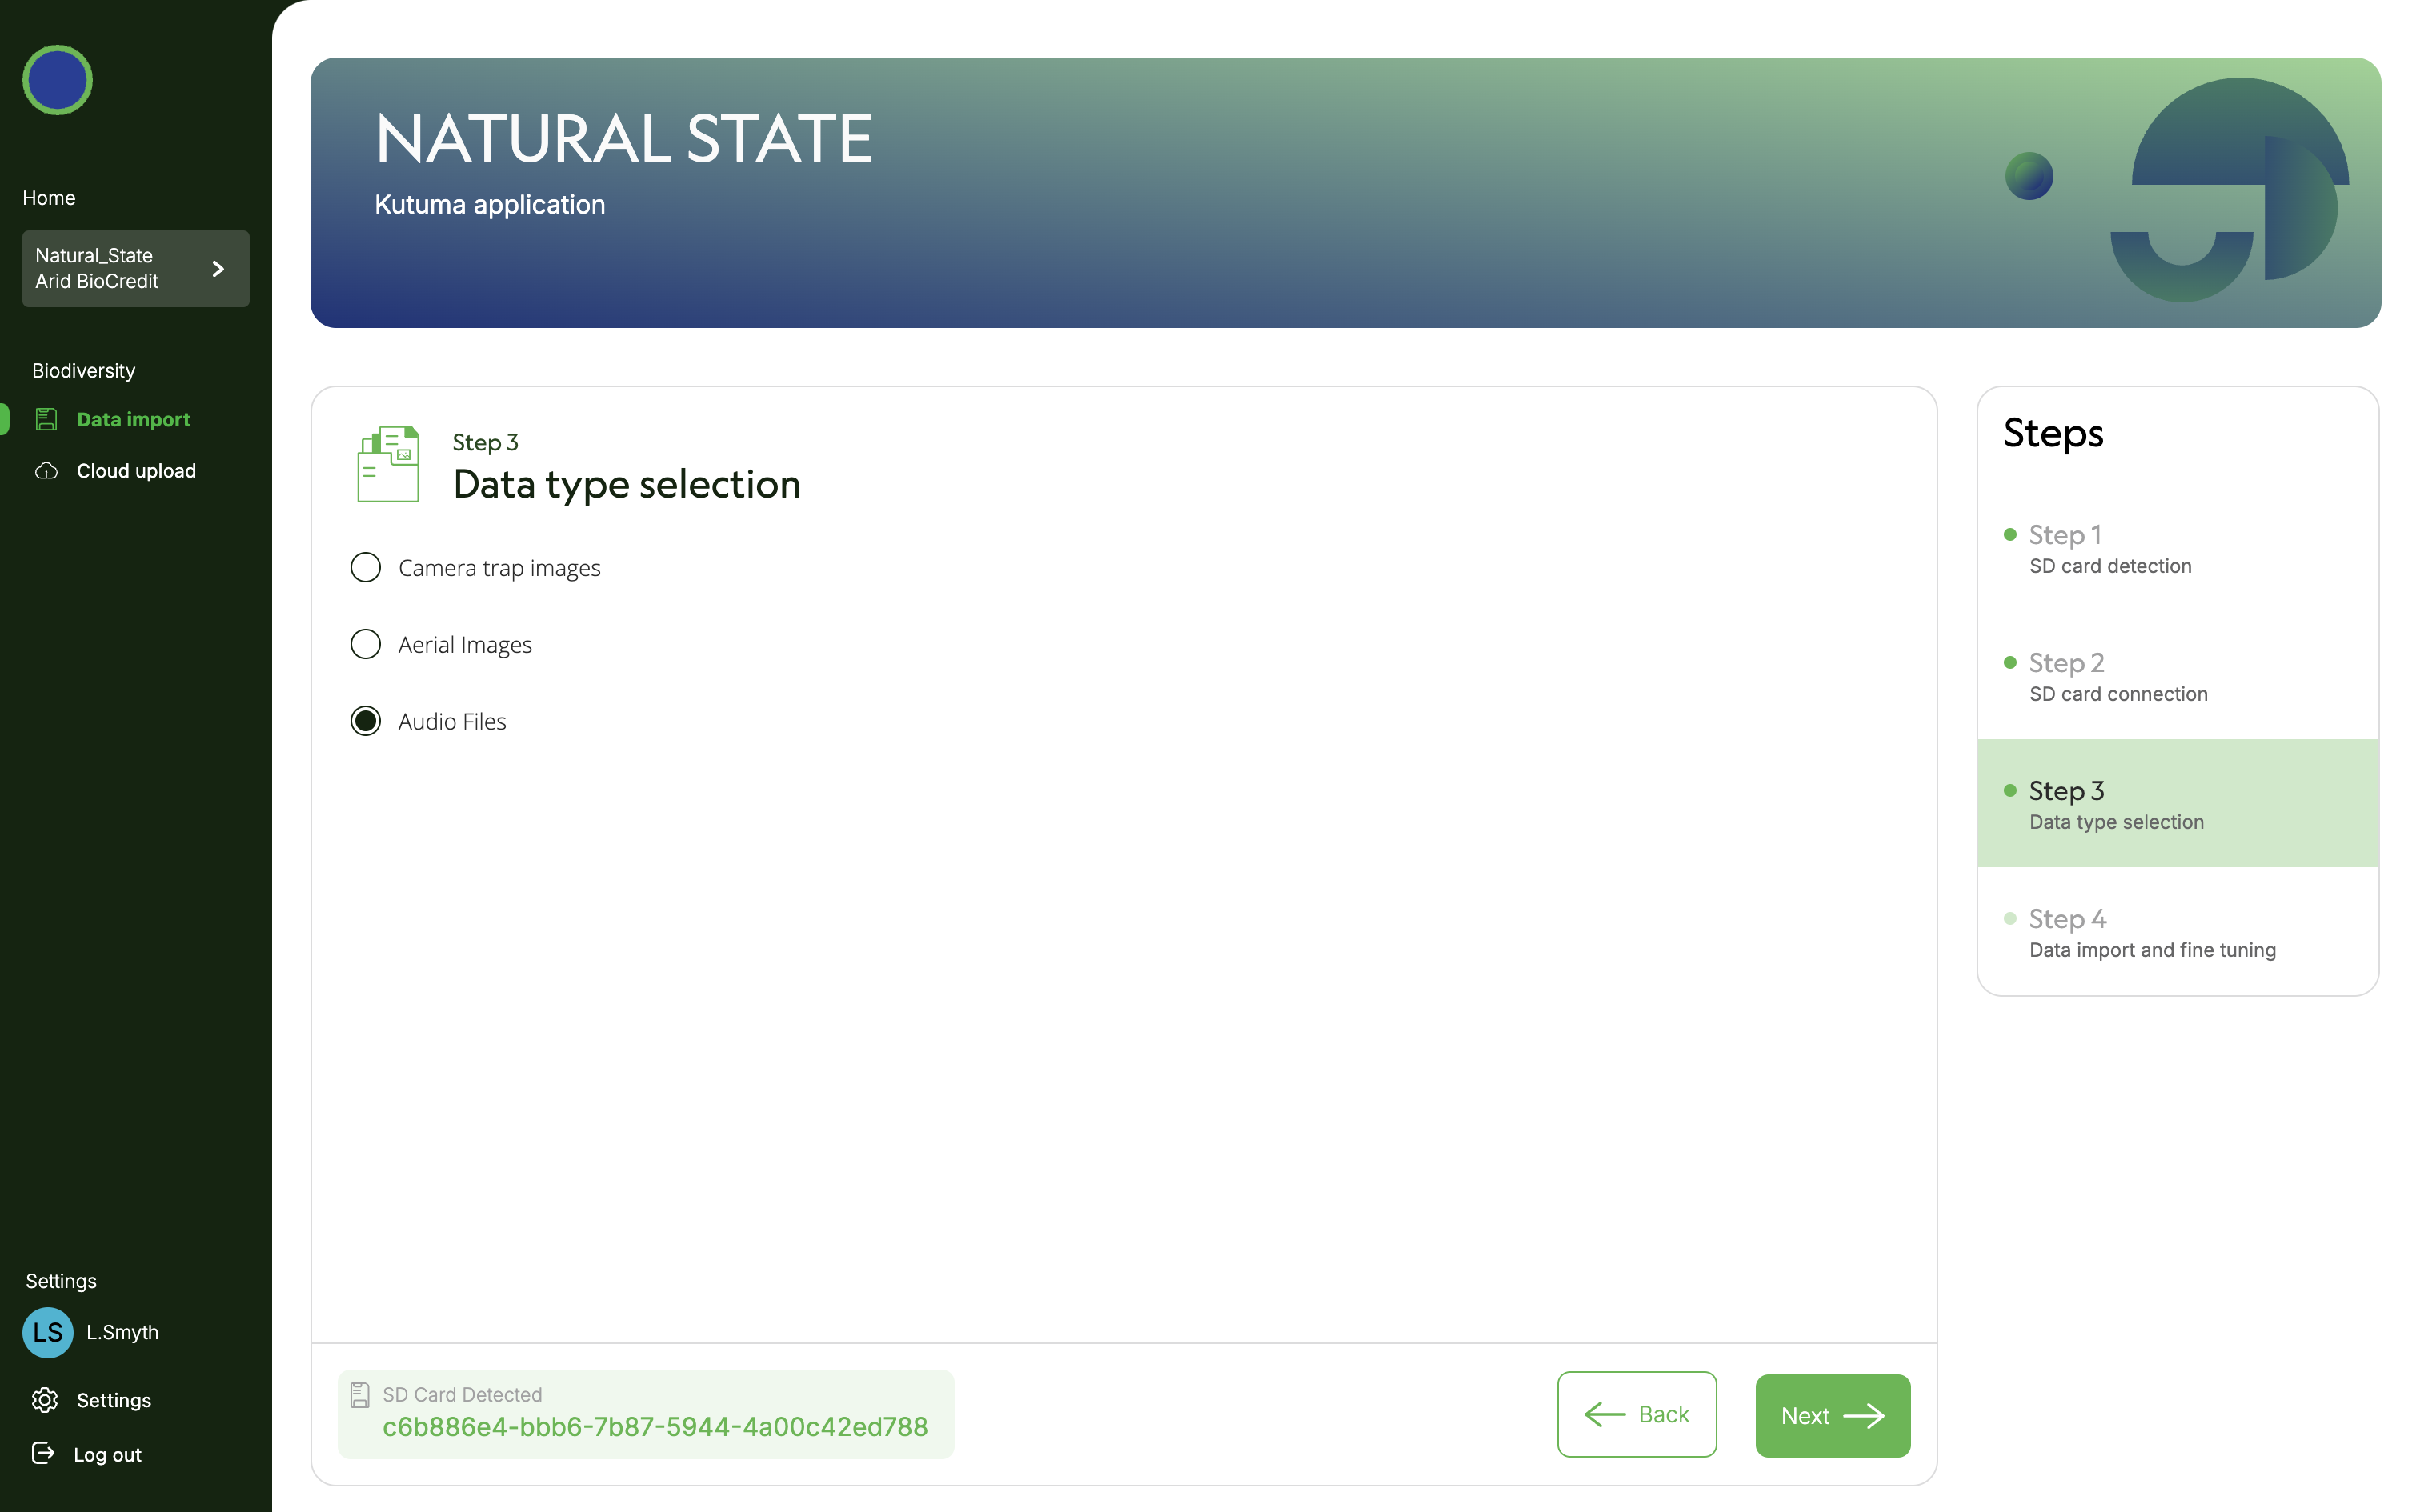
 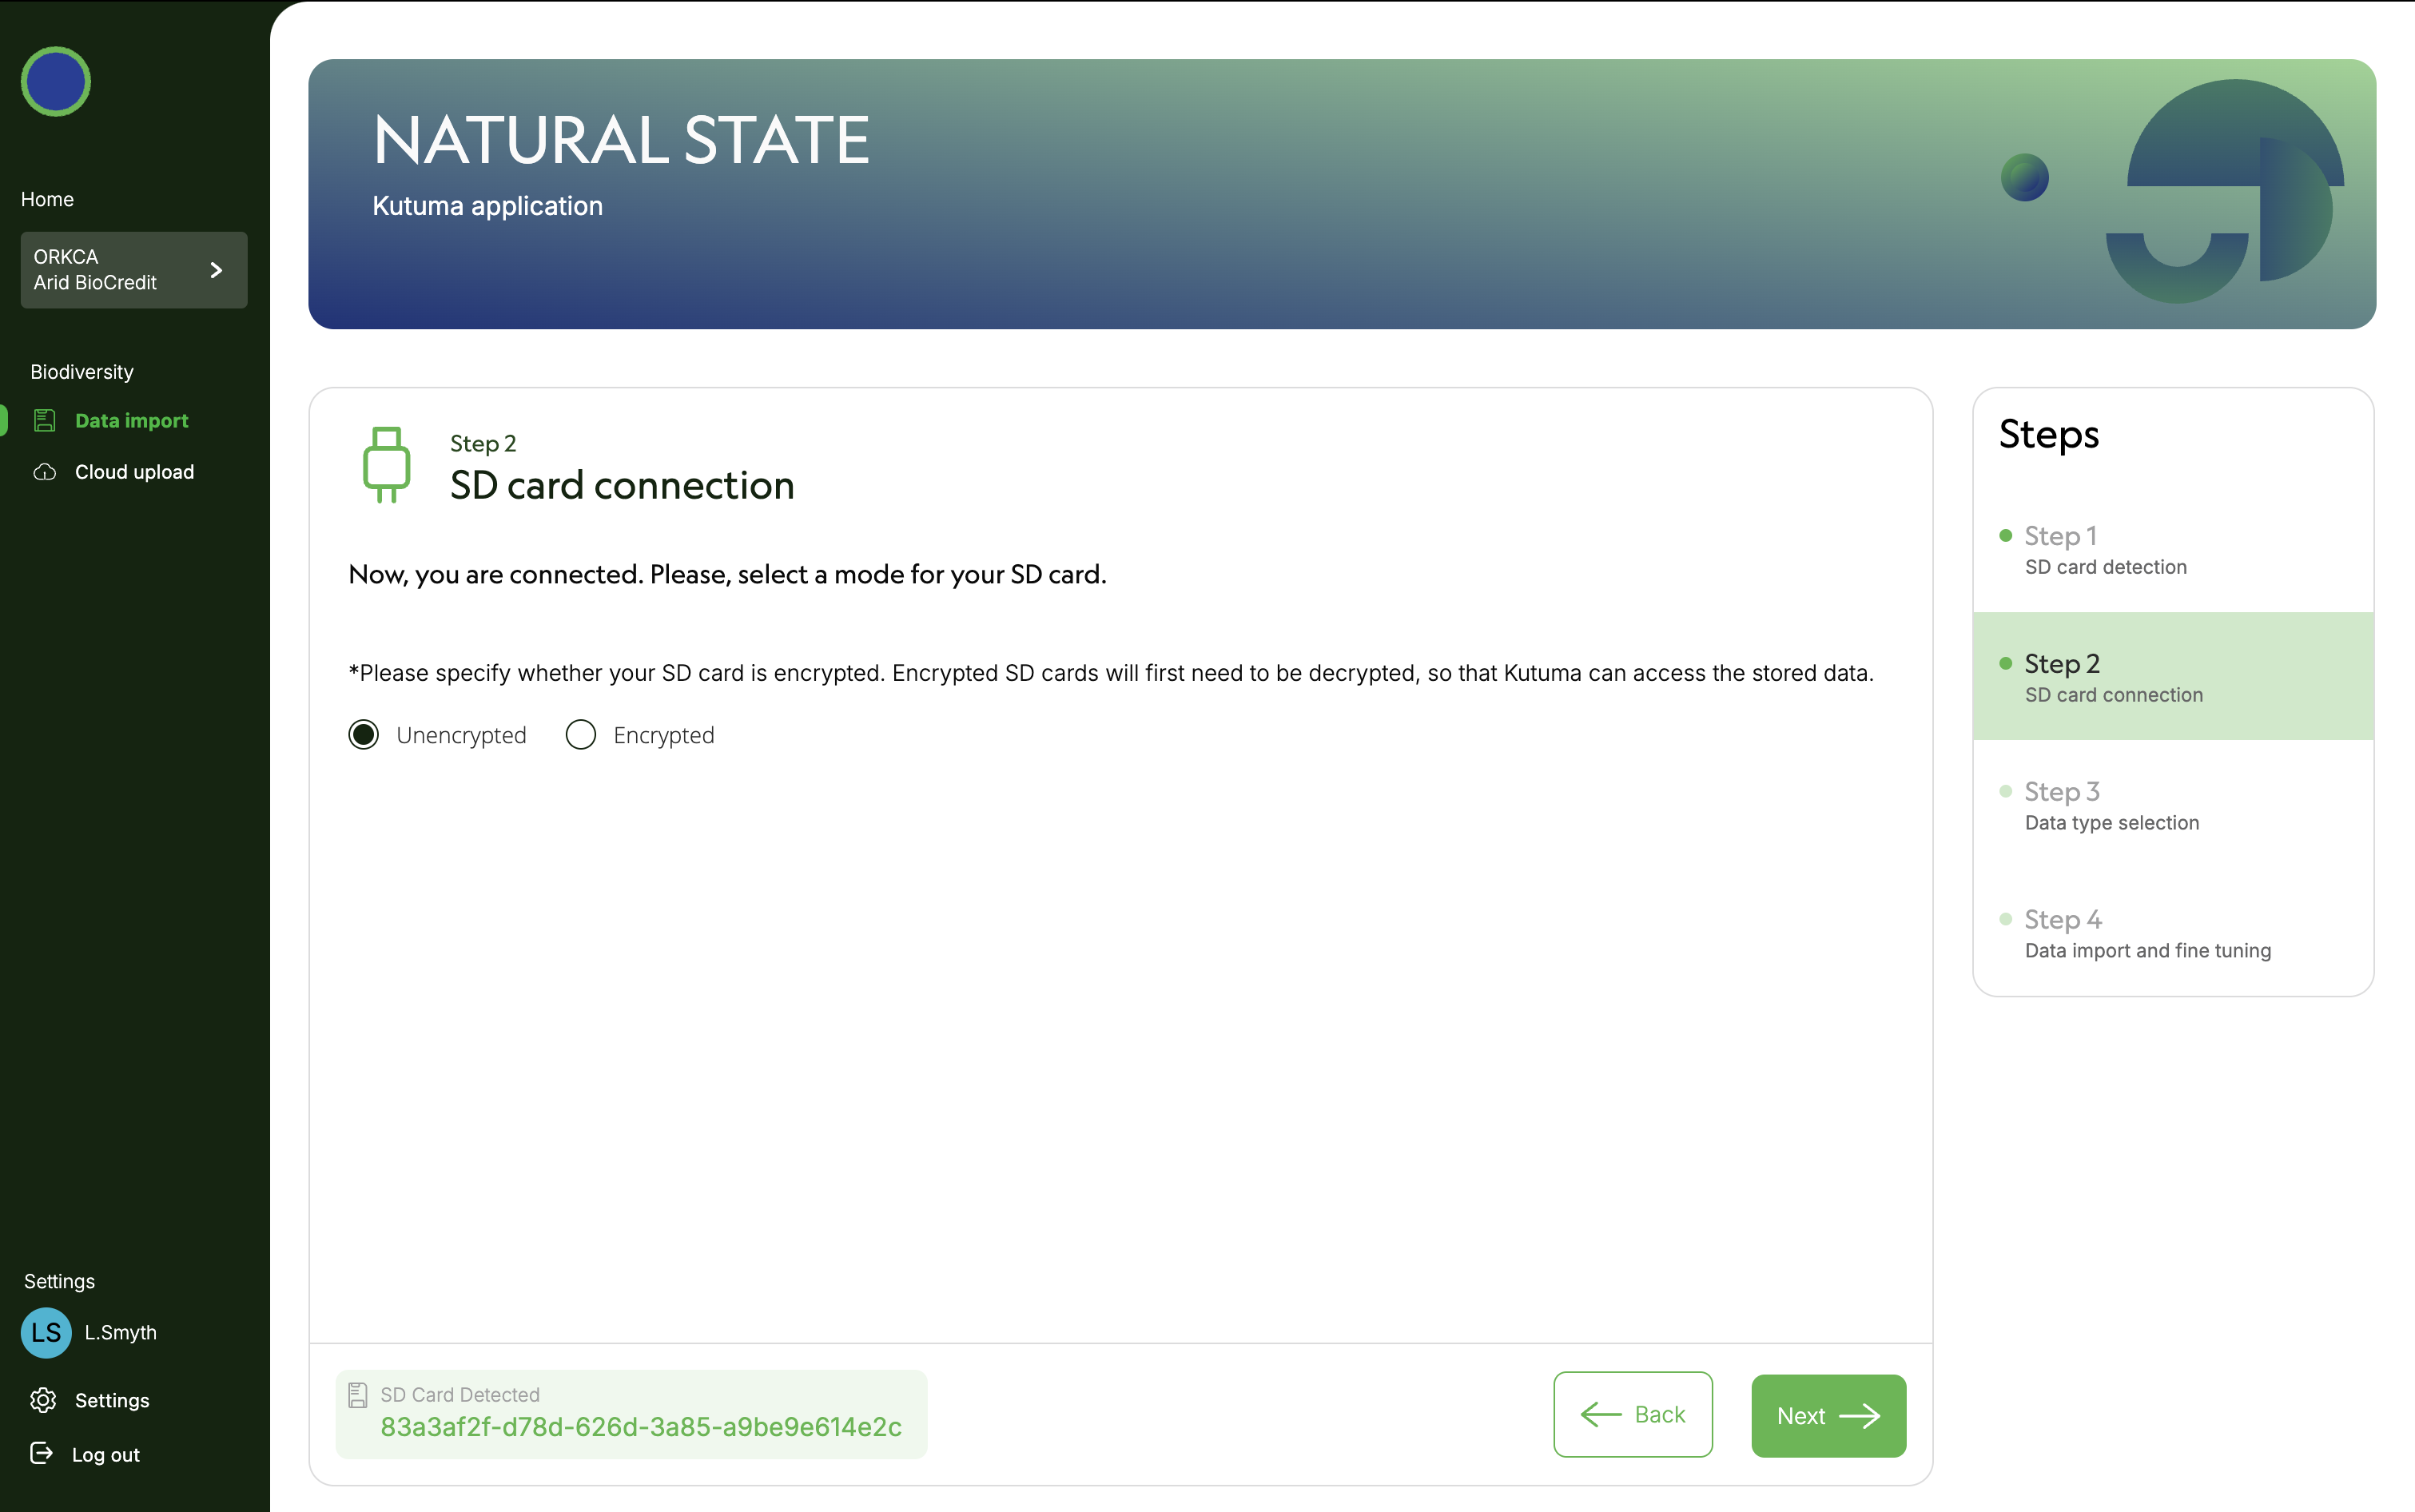 14) Specify data type (in this case audio files). Click next.
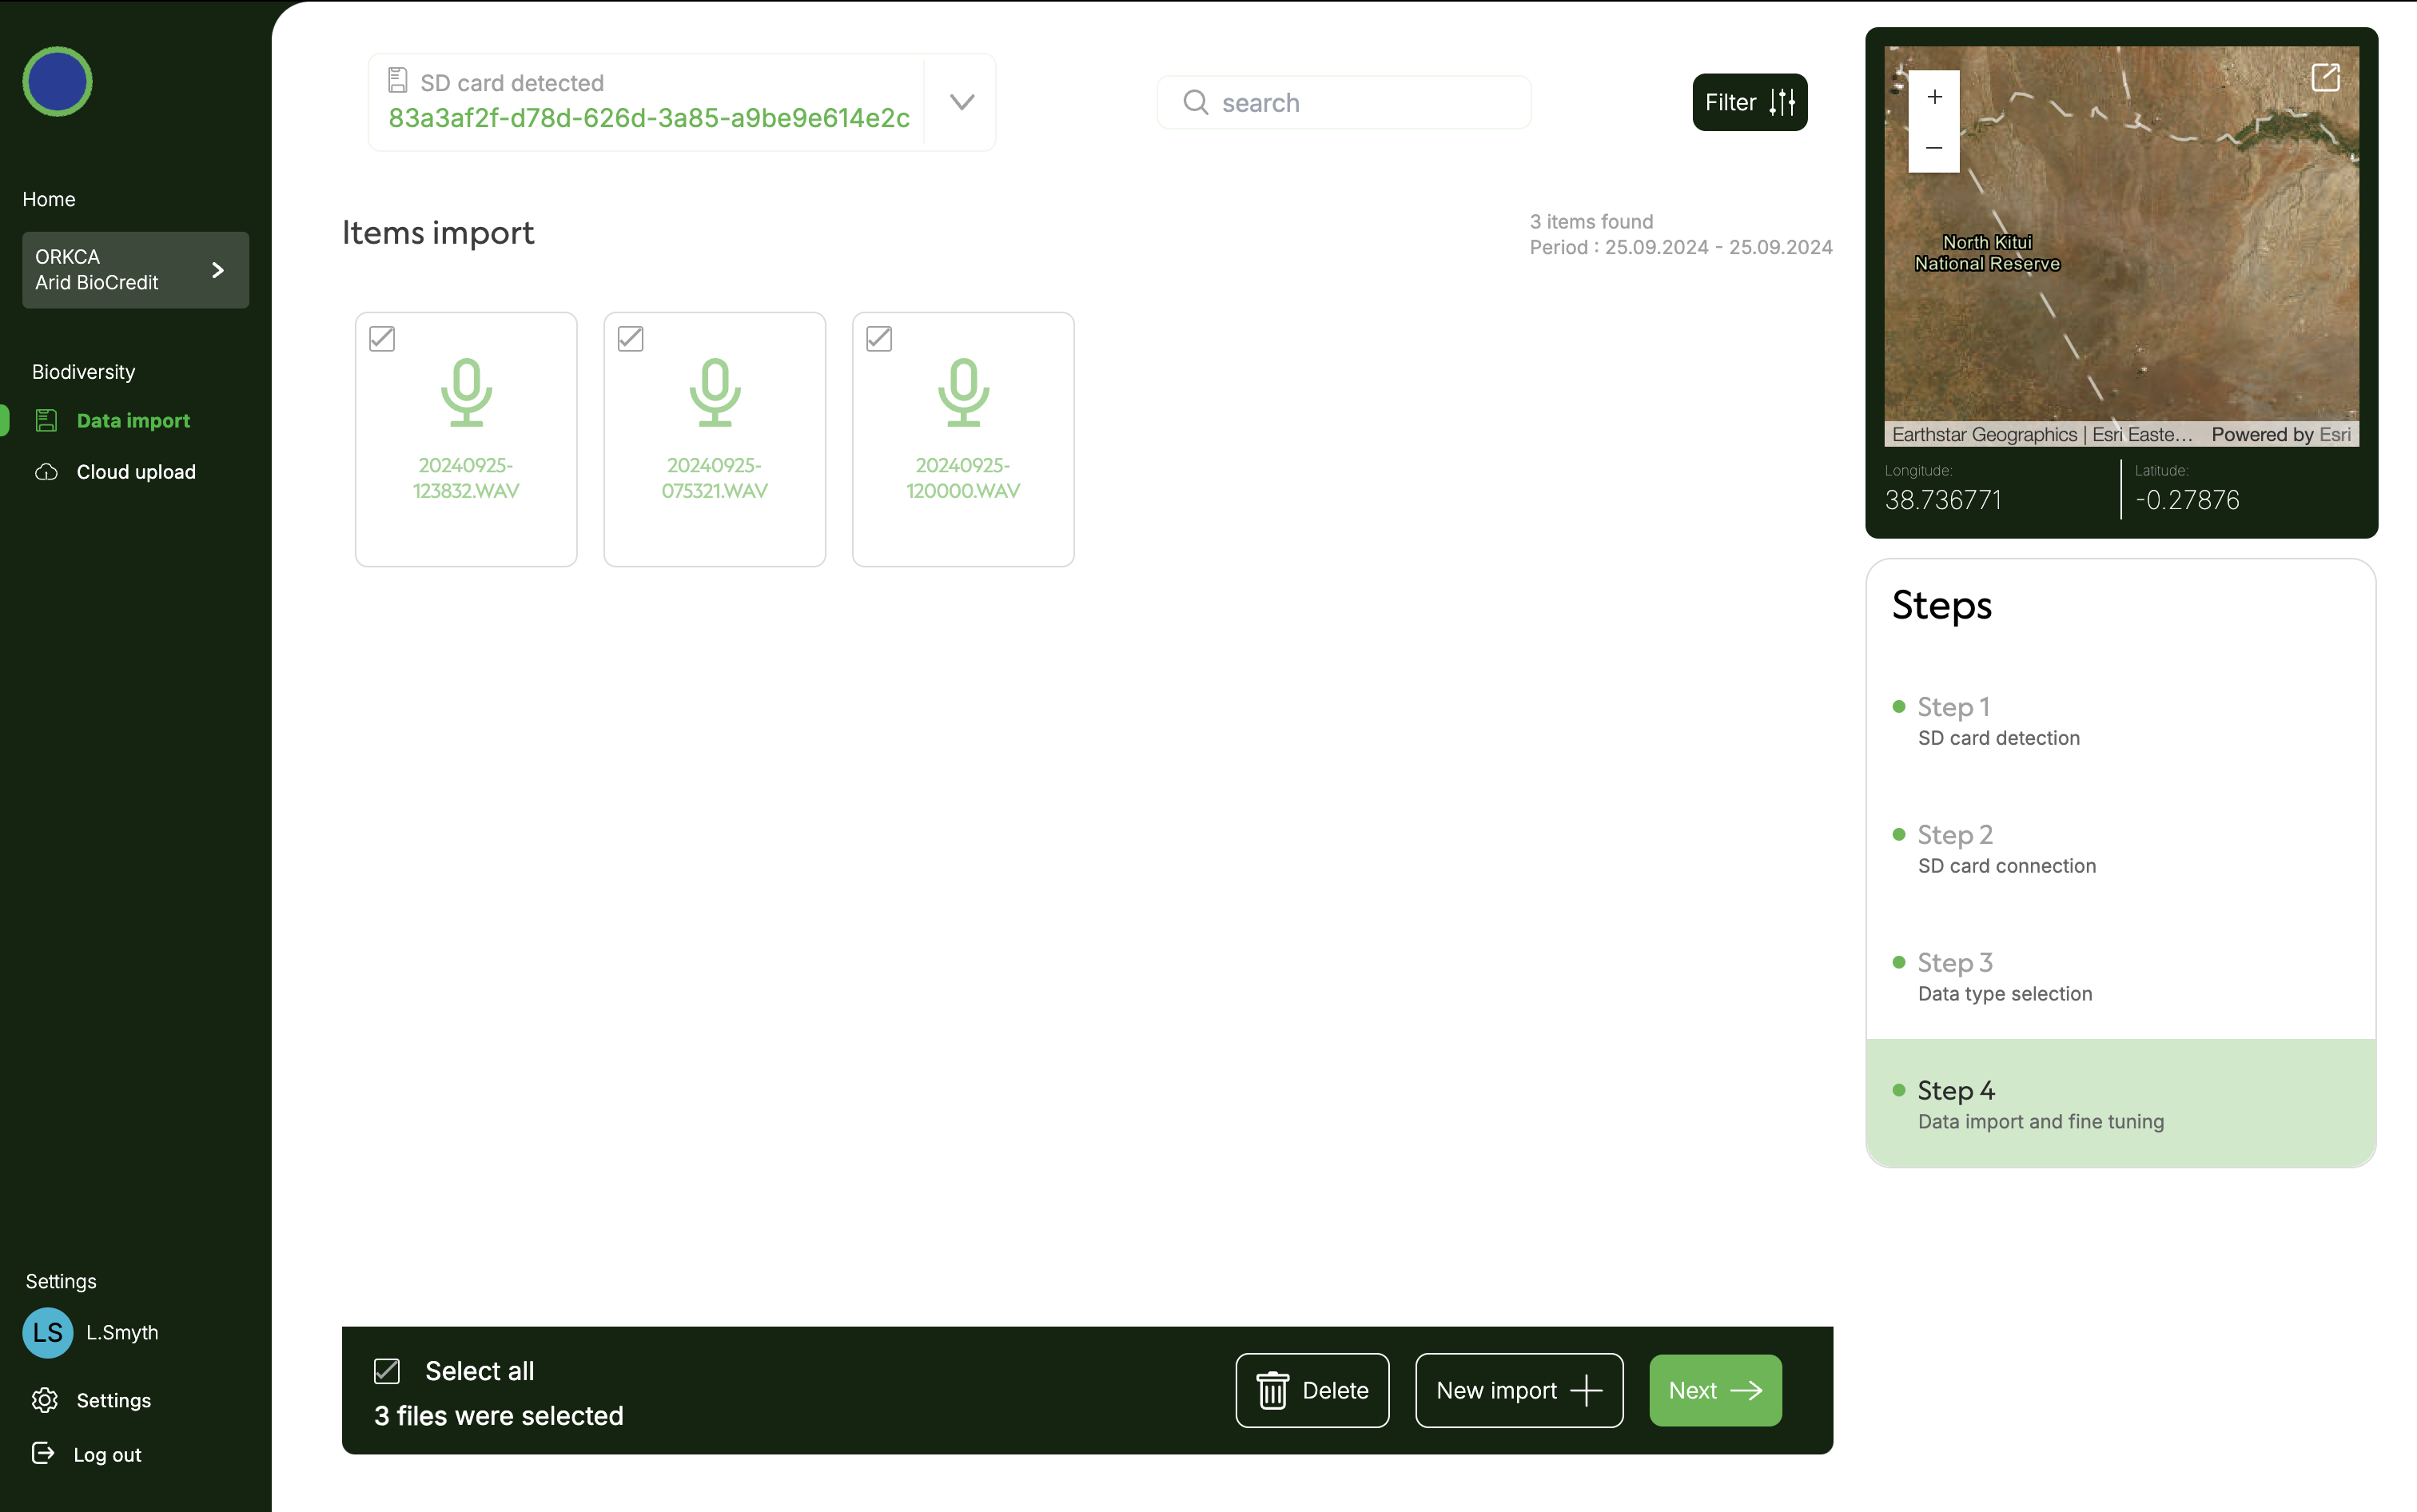
  15) Once data files have appeared on screen, select all of them. Click next. Then click Got It.
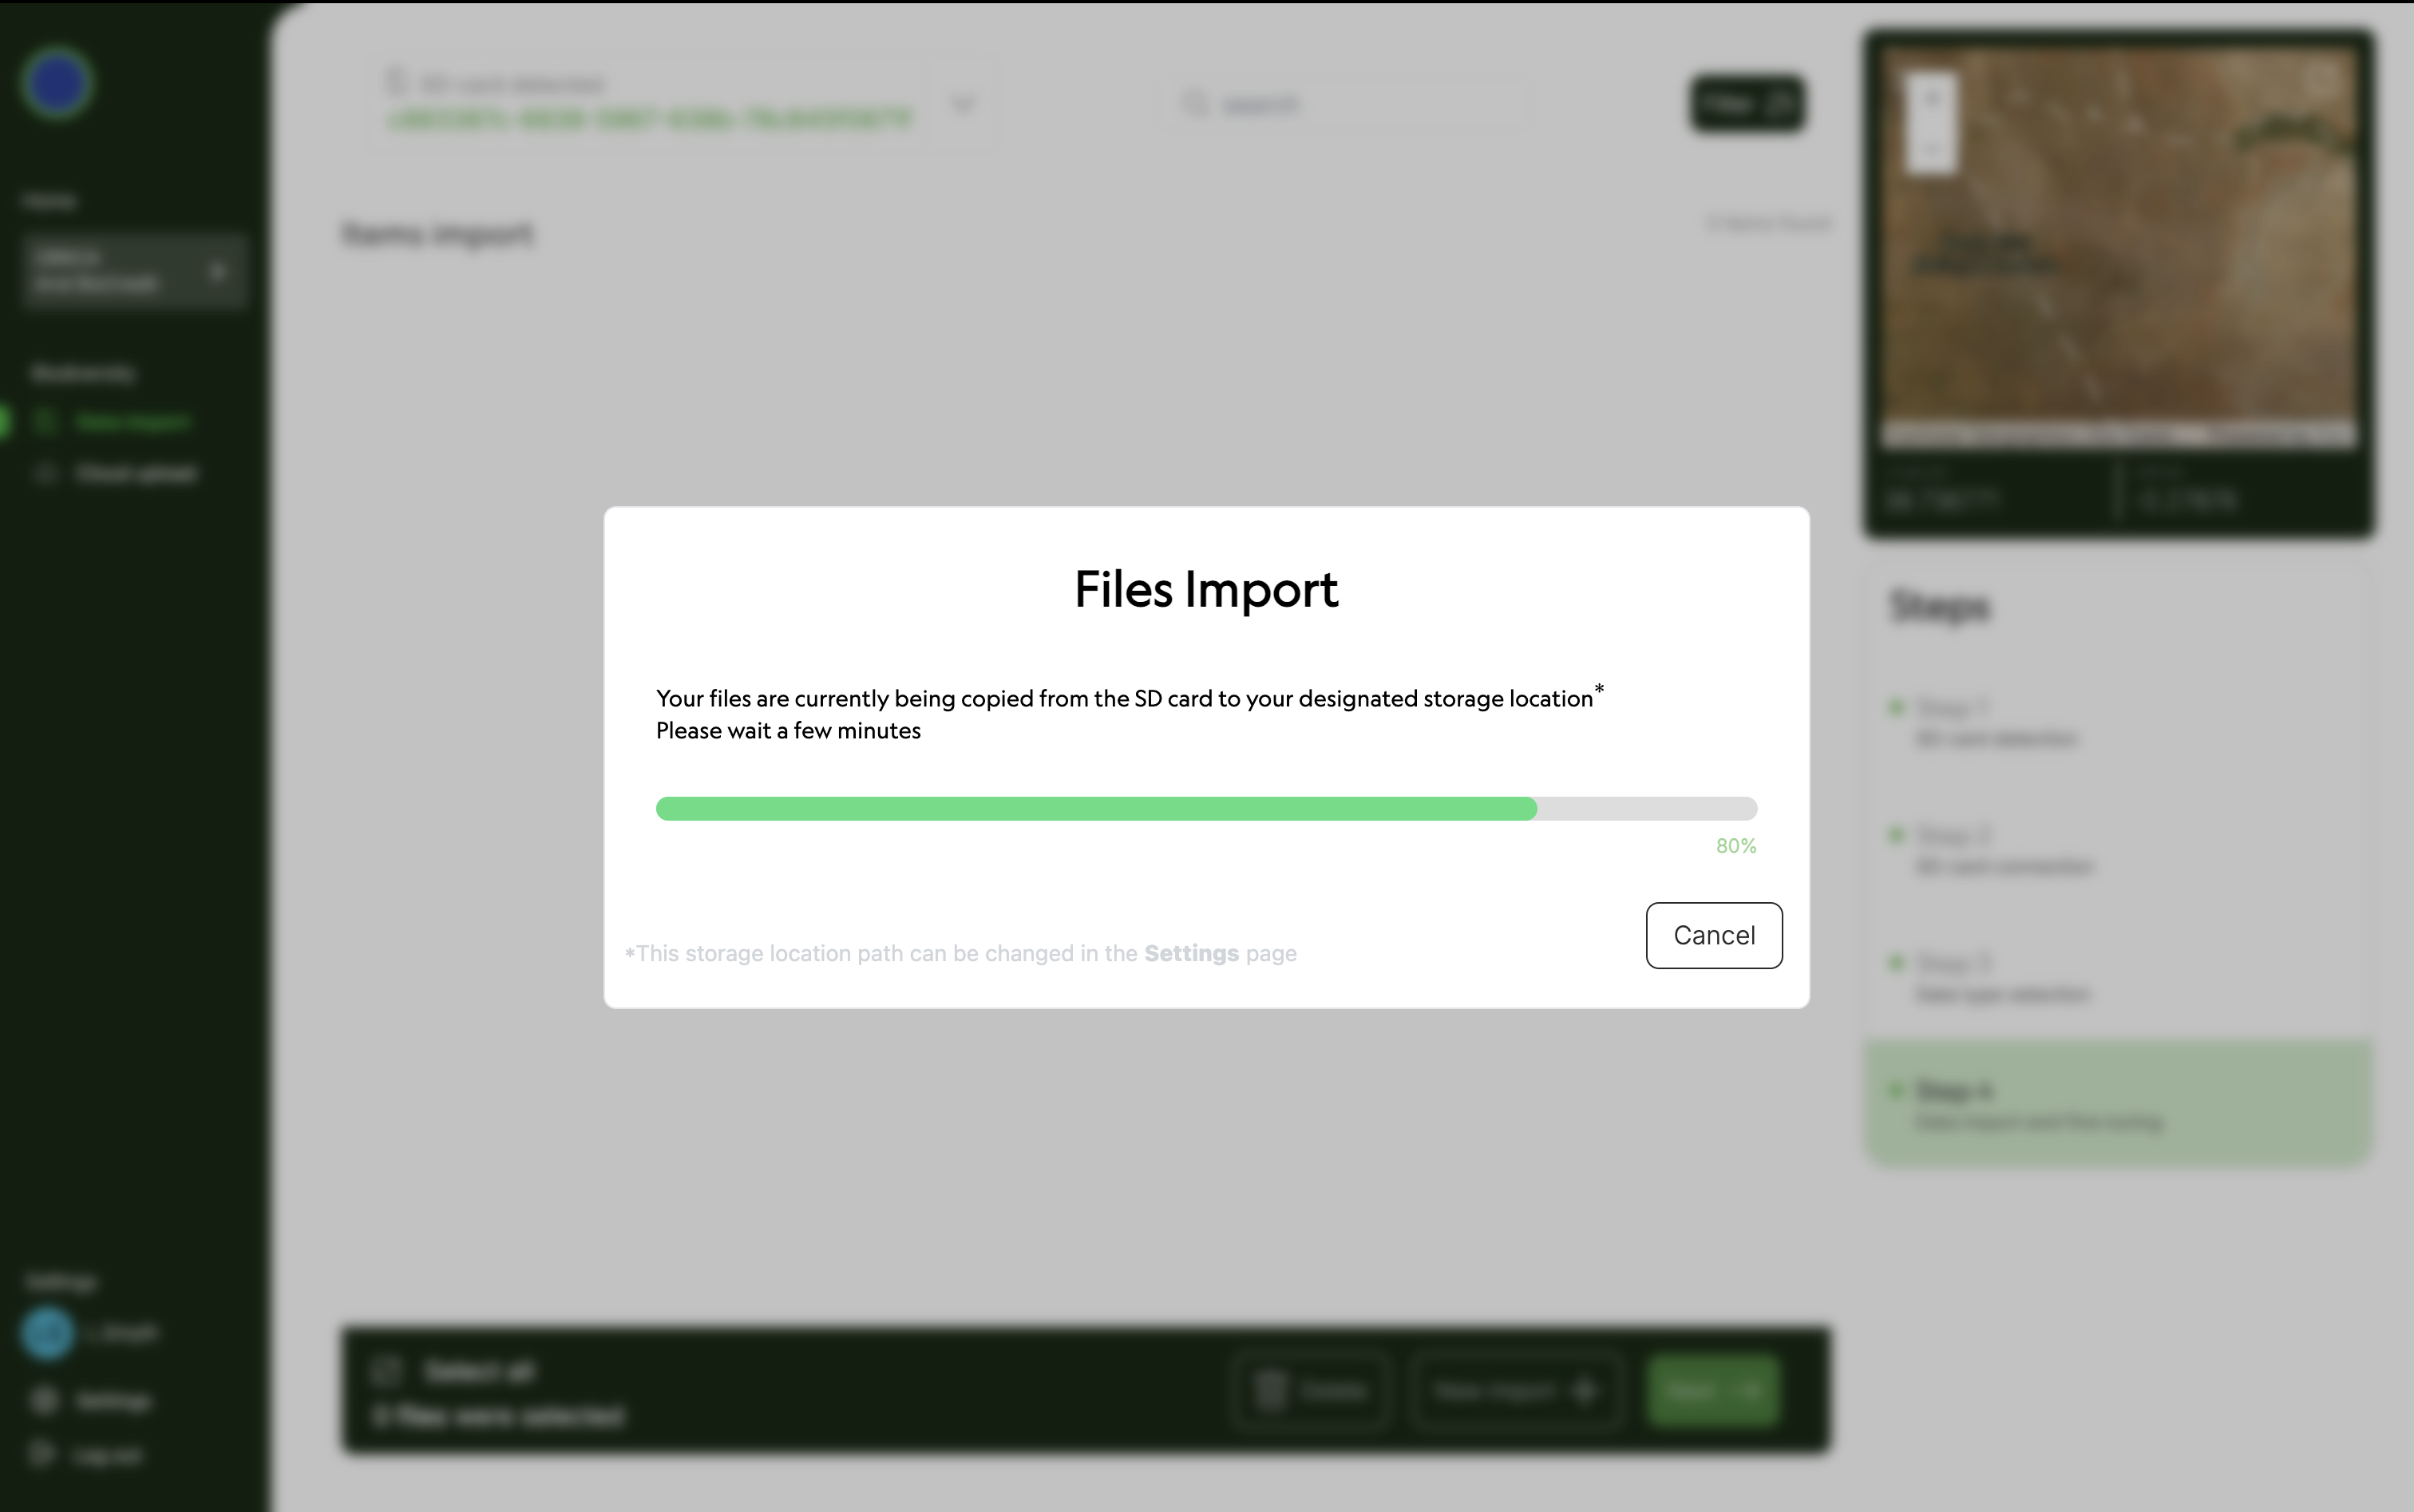
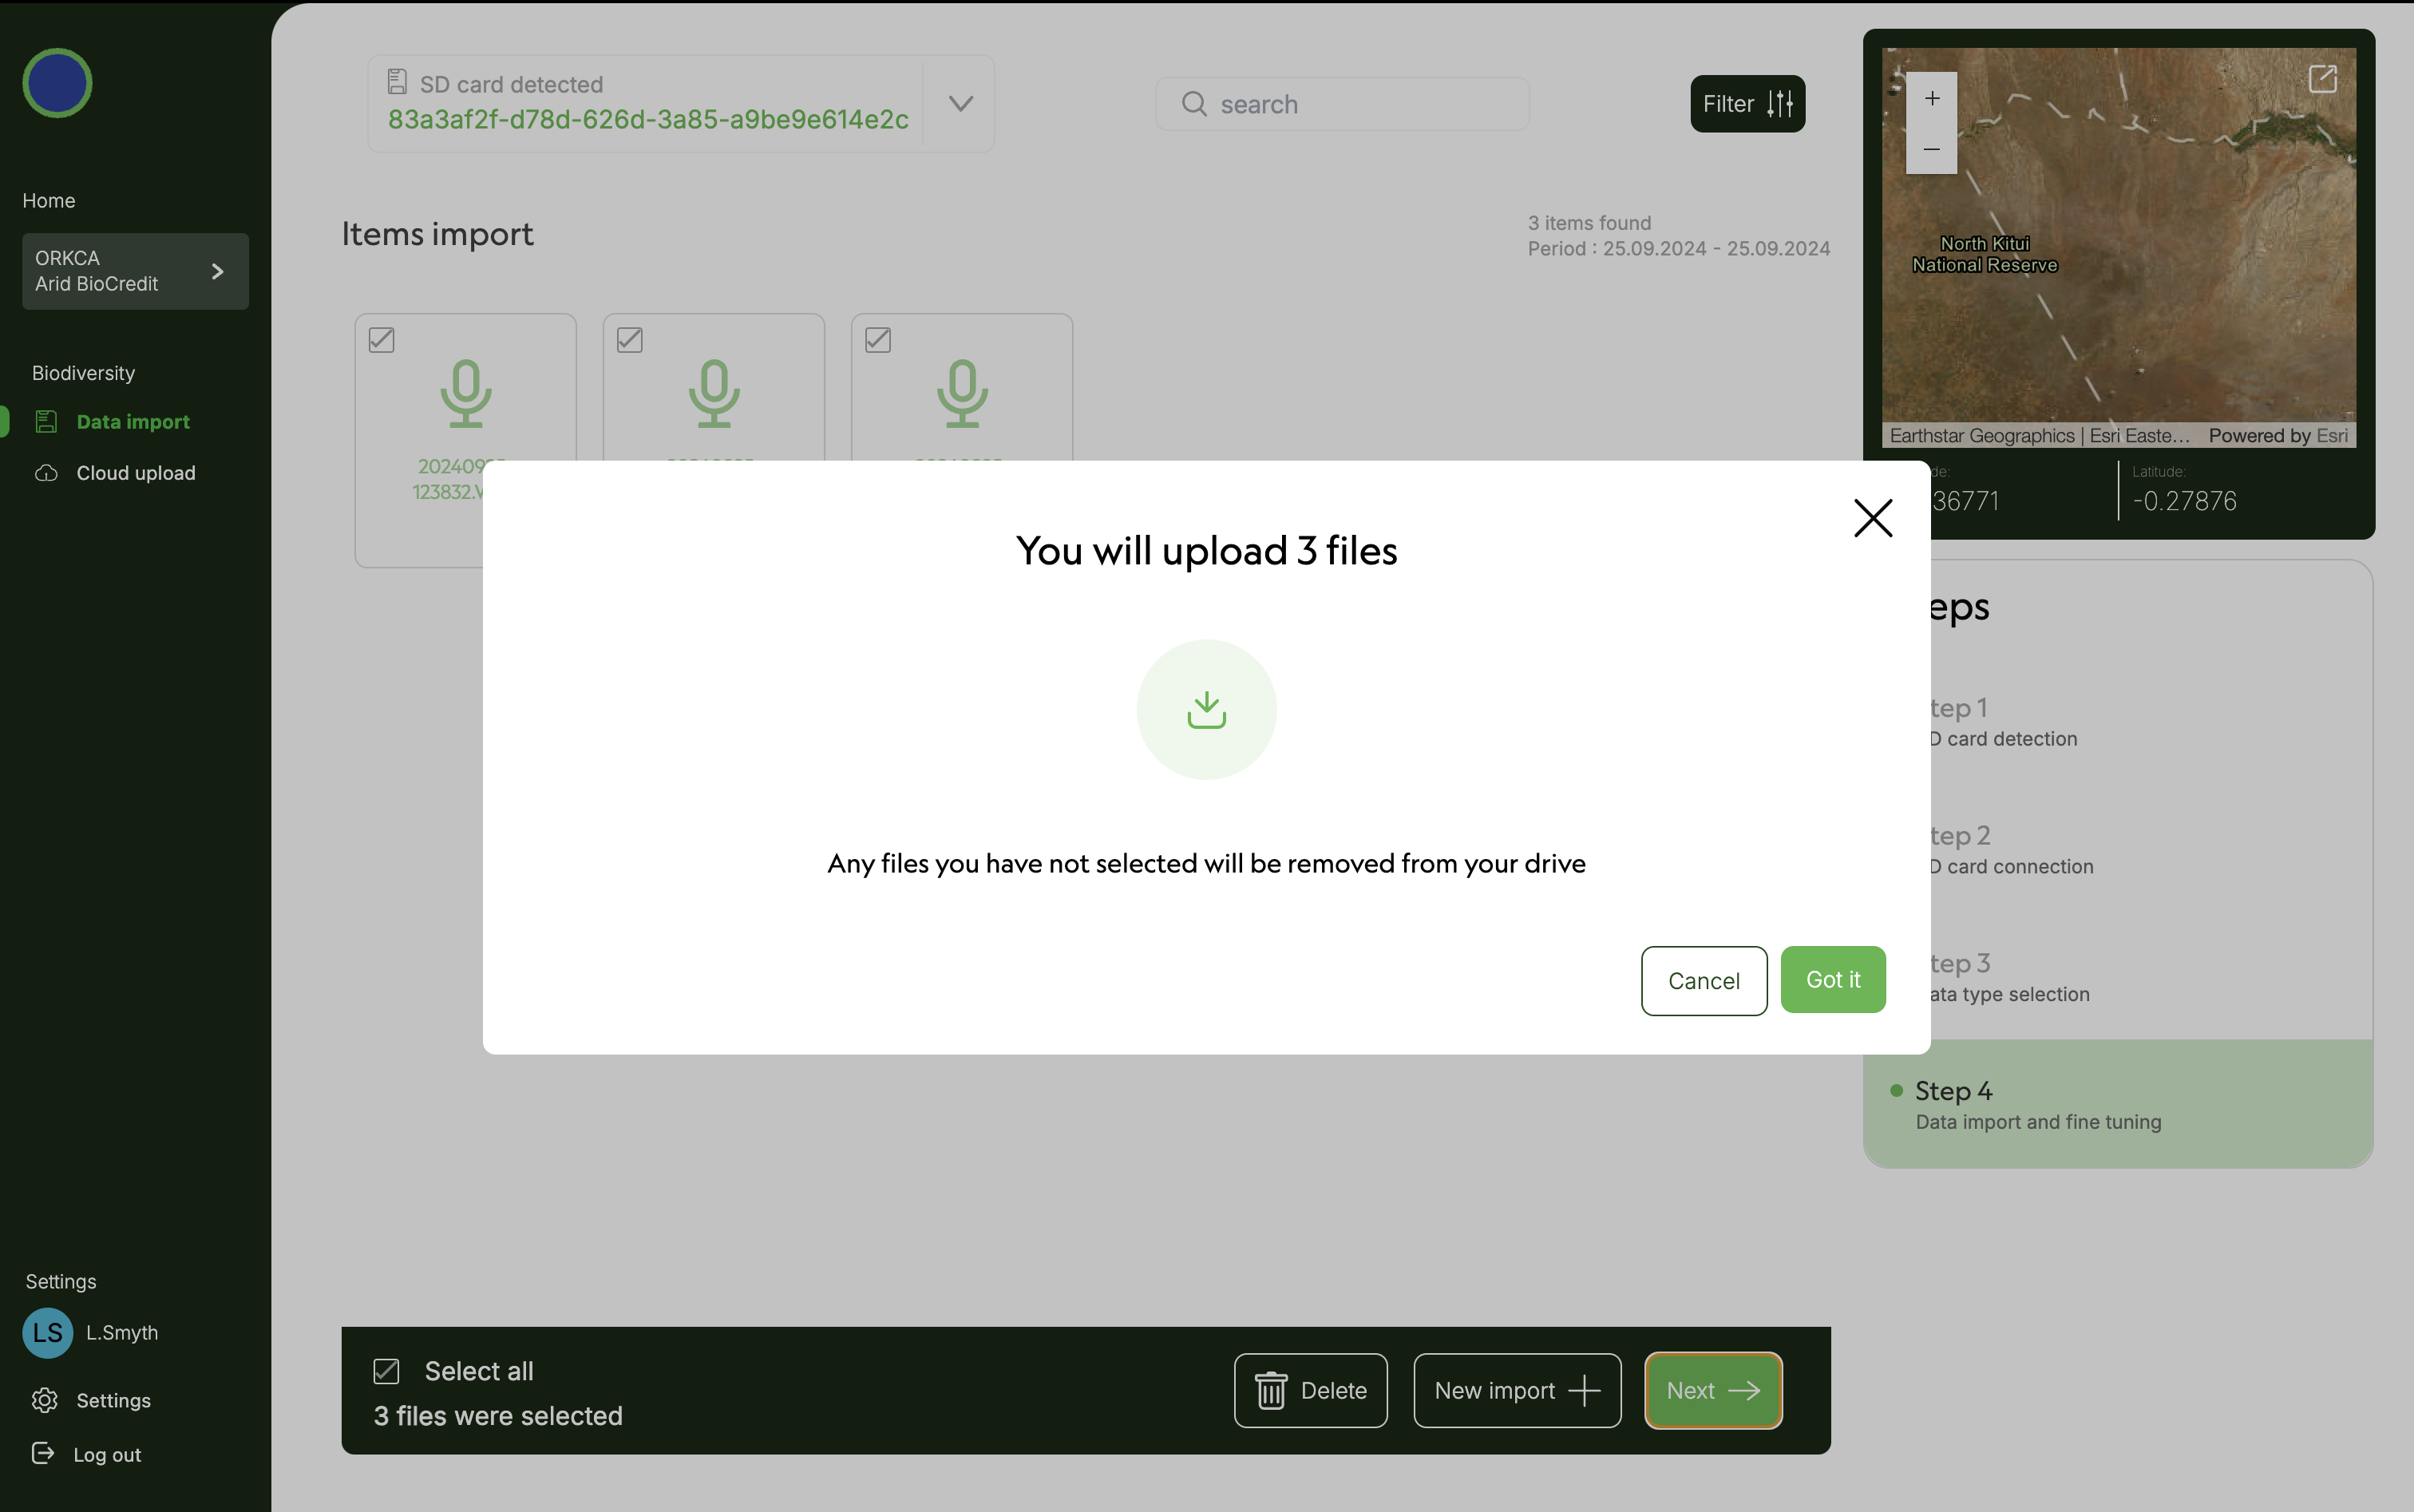 16) When progress bar reaches 100% files are now stored locally on your computer’s hard drive. They should be uploaded to the cloud when connected to good internet.
  17) Eject SD card from computer. 18) Click on Data import under Biodiversity on left hand menu to sart importing data from the next SD card. 19) Repeat steps 6-11 until these data are stored on your computer’s hard drive. 20) Repeat for all AudioMoth SD cards. 21) Close Kutuma.
In place with unlimited internet push data up to cloud 1) Plug in the harddrive that you moved the data onto in the office. 2) Open Kutuma, and log in. 3) Select platform, organization, project and Biodiversity. 4) Click on Cloud upload under Biodiversity on the left hand menu. 5) Click select all. 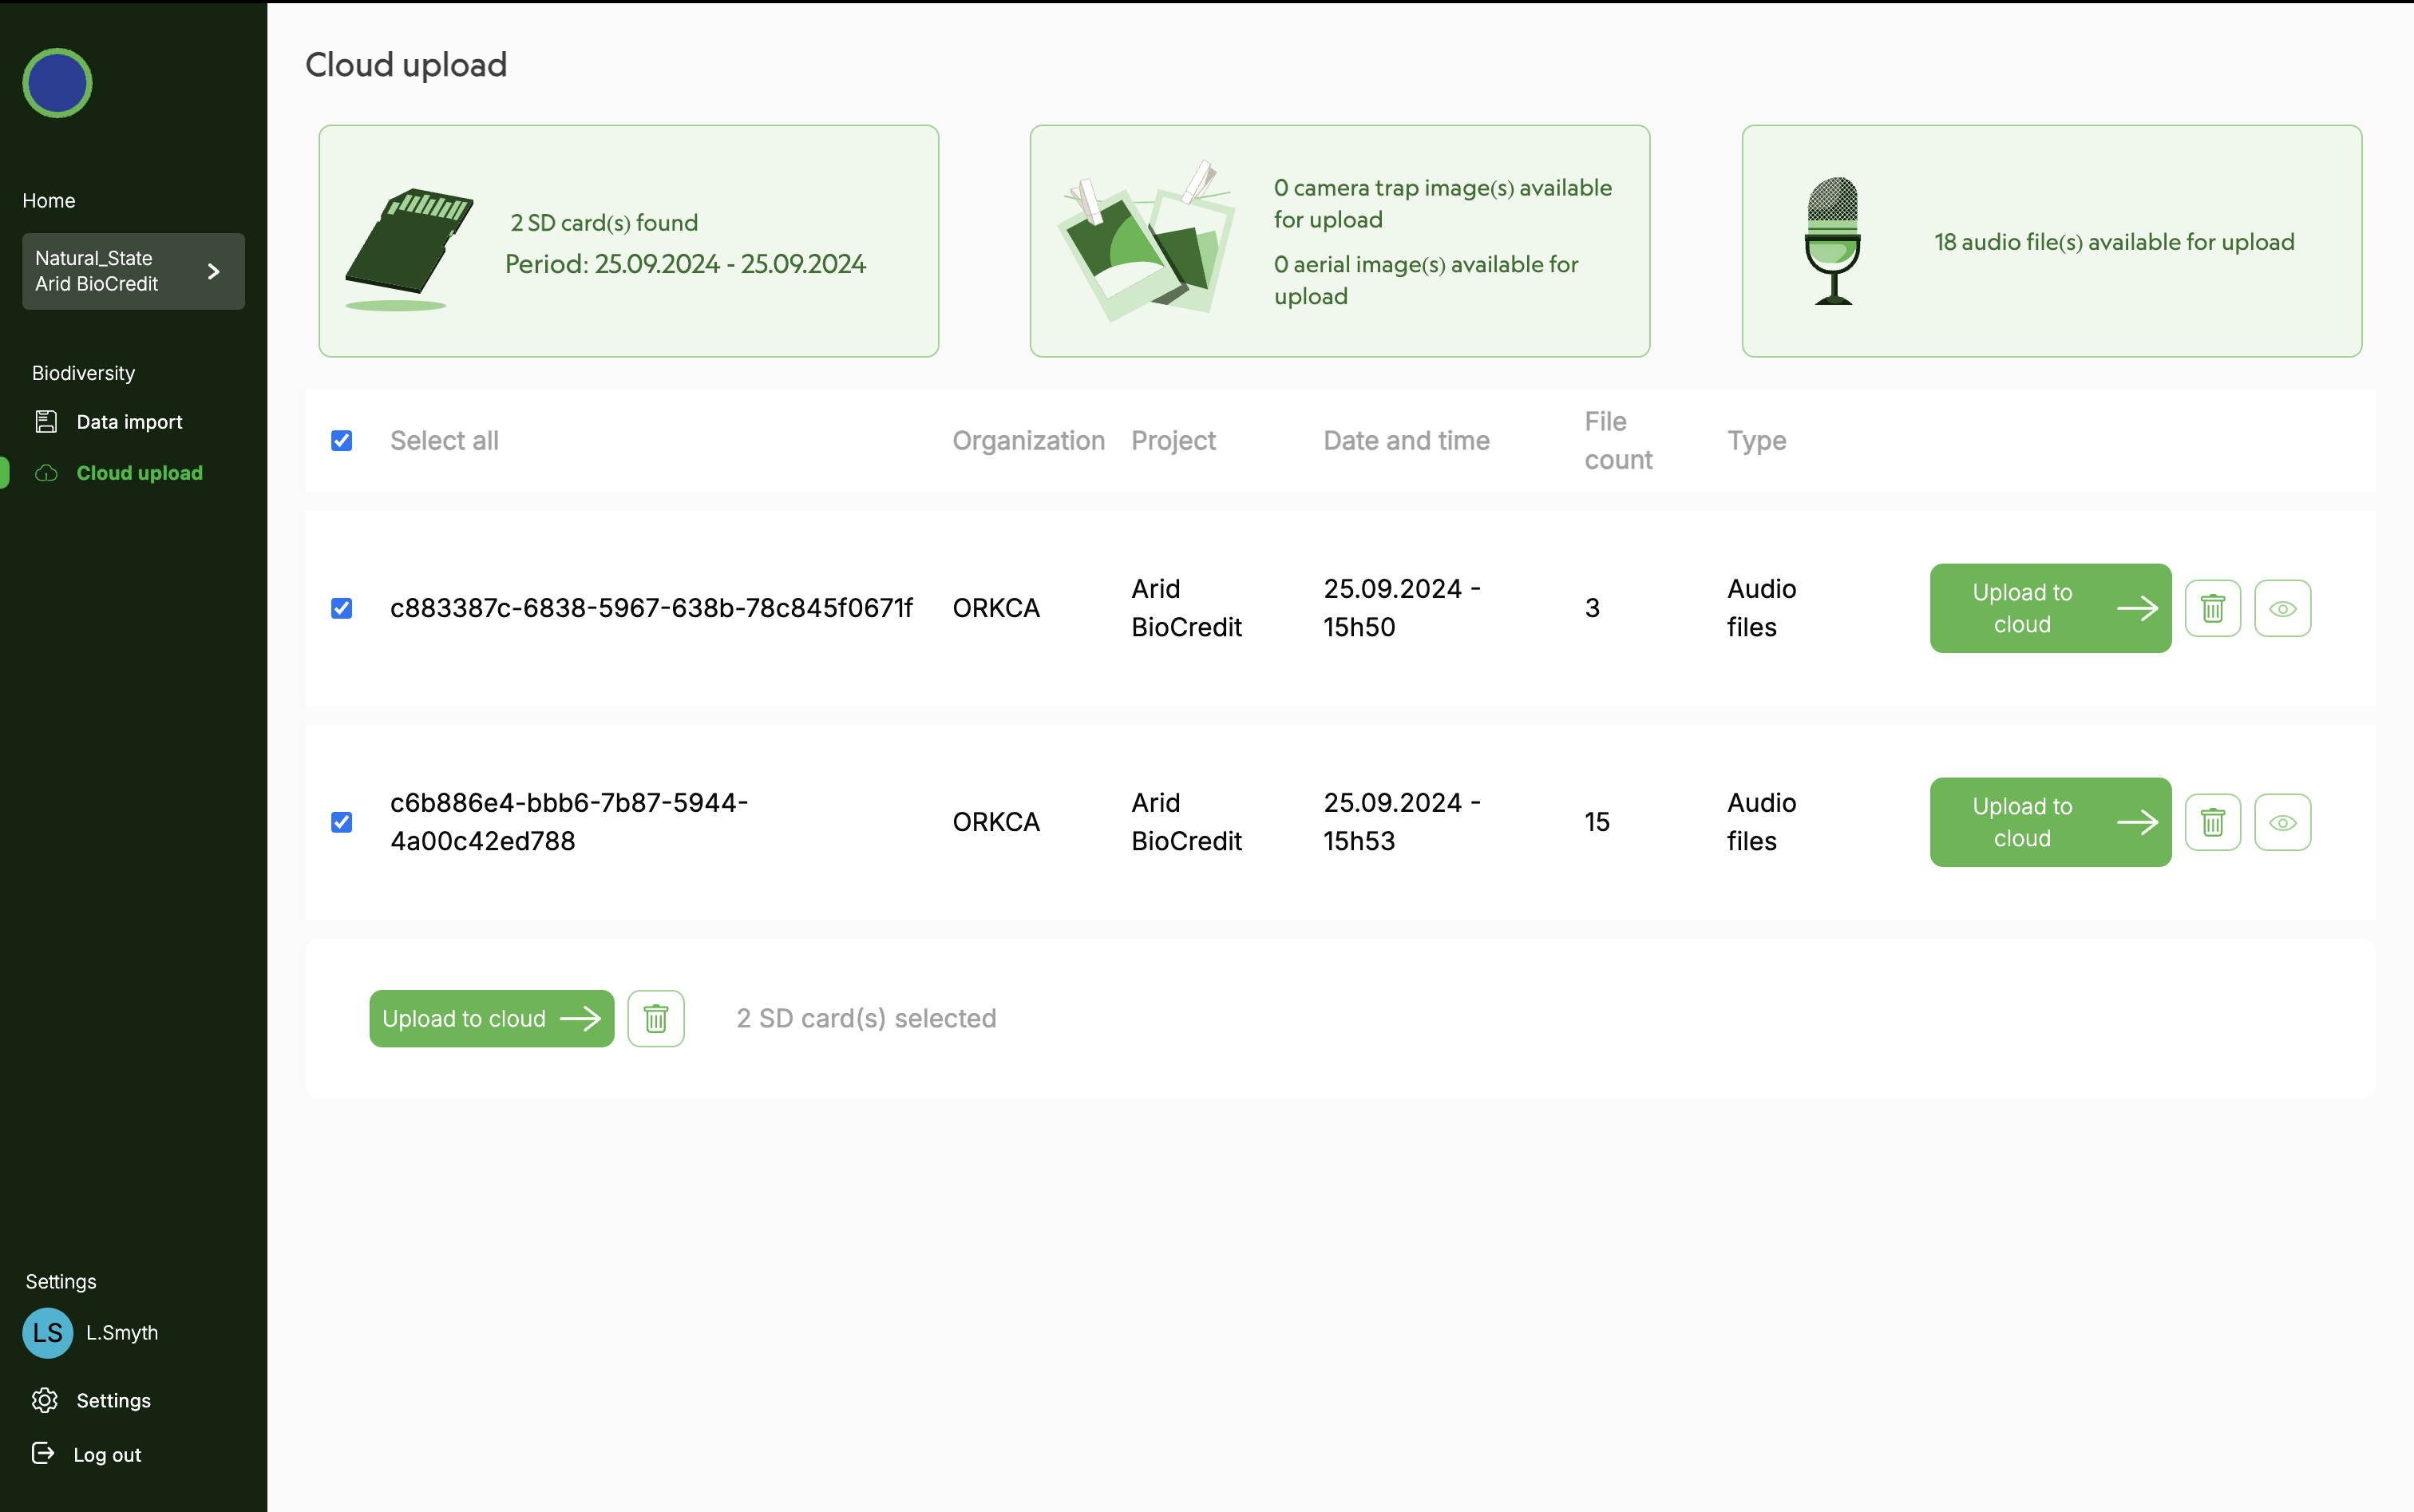 6) Click Upload to cloud.
Only once all data has been uploaded to cloud 1) Format each SD card and safely eject from computer. 2) Place SD cards in a clearly labelled box for clean, formatted SD cards. Close the box! 3) Now they are ready for use again.
6. RETRIEVAL
6.1 SAMPLING PREPARATION
These steps need to happen in the office, before going to the field.
Equipment List: Pack the car
- Handheld GPS with spare Eneloop Pro batteries and preloaded with coordinates of actual sites.
- Mobile device (phone or tablet): fully charged, preloaded with the S123 app and Acoustic Survey form.
- QR code representing missing device: stuck to your GPS or another obvious place that can be scanned when necessary.
- Box for full SD Cards: Clearly labelled.
- Mallet for taking poles out of the ground.
- Water and a medical kit in the vehicle.
6.2 SAMPLING PROCEDURES
Acoustic Monitor Retrieval 1) Navigate to the relevant sampling station using a handheld GPS with actual station coordinates loaded. 2) Approach the AudioMoth, and speak clearly to is, stating the station number, date and time. 3) Undo to velcro to remove it from the tree or pole on which it was deployed and open the plastic casing. 4) Switch the AudioMoth to USB/off mode. 5) Open the Acoustic S123 Form and begin capturing the required information. 6) Remove the used SD card, scan into S123 and place in a clearly labelled box. If the device or SD card is missing then scan the QR code that represents “missing device”. 16) Finish recording details of the AudioMoth retrieval in S123. Ensure the location is recorded within 2m of the AudioMoth. 17) Remove pole and place all equipment in vehicle.
6.3 POST PROCESSING
Within 7 days of the completion of an acoustic survey check, data must be uploaded to lakehouse (Natural State’s data storage platform) using Kutuma:
At office after check (no internet required) 1) Plug webcam into computer. 2) Plug hard drive into computer. 3) Open the kutuma application.  4) Login using your esri credentials. 5) Select Survey123, then your organization and your project. 6) Click on biodiversity.
  7) Click on settings in the bottom left corner. 8) Click on change storage location.
  9) Select the hard drive where you would like to store your data. 10) Click on Data import under Biodiversity on left hand menu. 11) Scan QR code of SD card containing the data to upload.
  12) Plug SD card into computer. Computer must read SD card to proceed. 13) Specify that SD card is unencrypted. Click next.
  14) Specify data type (in this case audio files). Click next.
  15) Once data files have appeared on screen, select all of them. Click next. Then click Got It.
 16) When progress bar reaches 100% files are now stored locally on your computer’s hard drive. They should be uploaded to the cloud when connected to good internet.
  17) Eject SD card from computer. 18) Click on Data import under Biodiversity on left hand menu to sart importing data from the next SD card. 19) Repeat steps 6-11 until these data are stored on your computer’s hard drive. 20) Repeat for all AudioMoth SD cards. 21) Close Kutuma.
In place with unlimited internet push data up to cloud 1) Plug in the harddrive that you moved the data onto in the office. 2) Open Kutuma, and log in. 3) Select platform, organization, project and Biodiversity. 4) Click on Cloud upload under Biodiversity on the left hand menu. 5) Click select all.  6) Click Upload to cloud.
 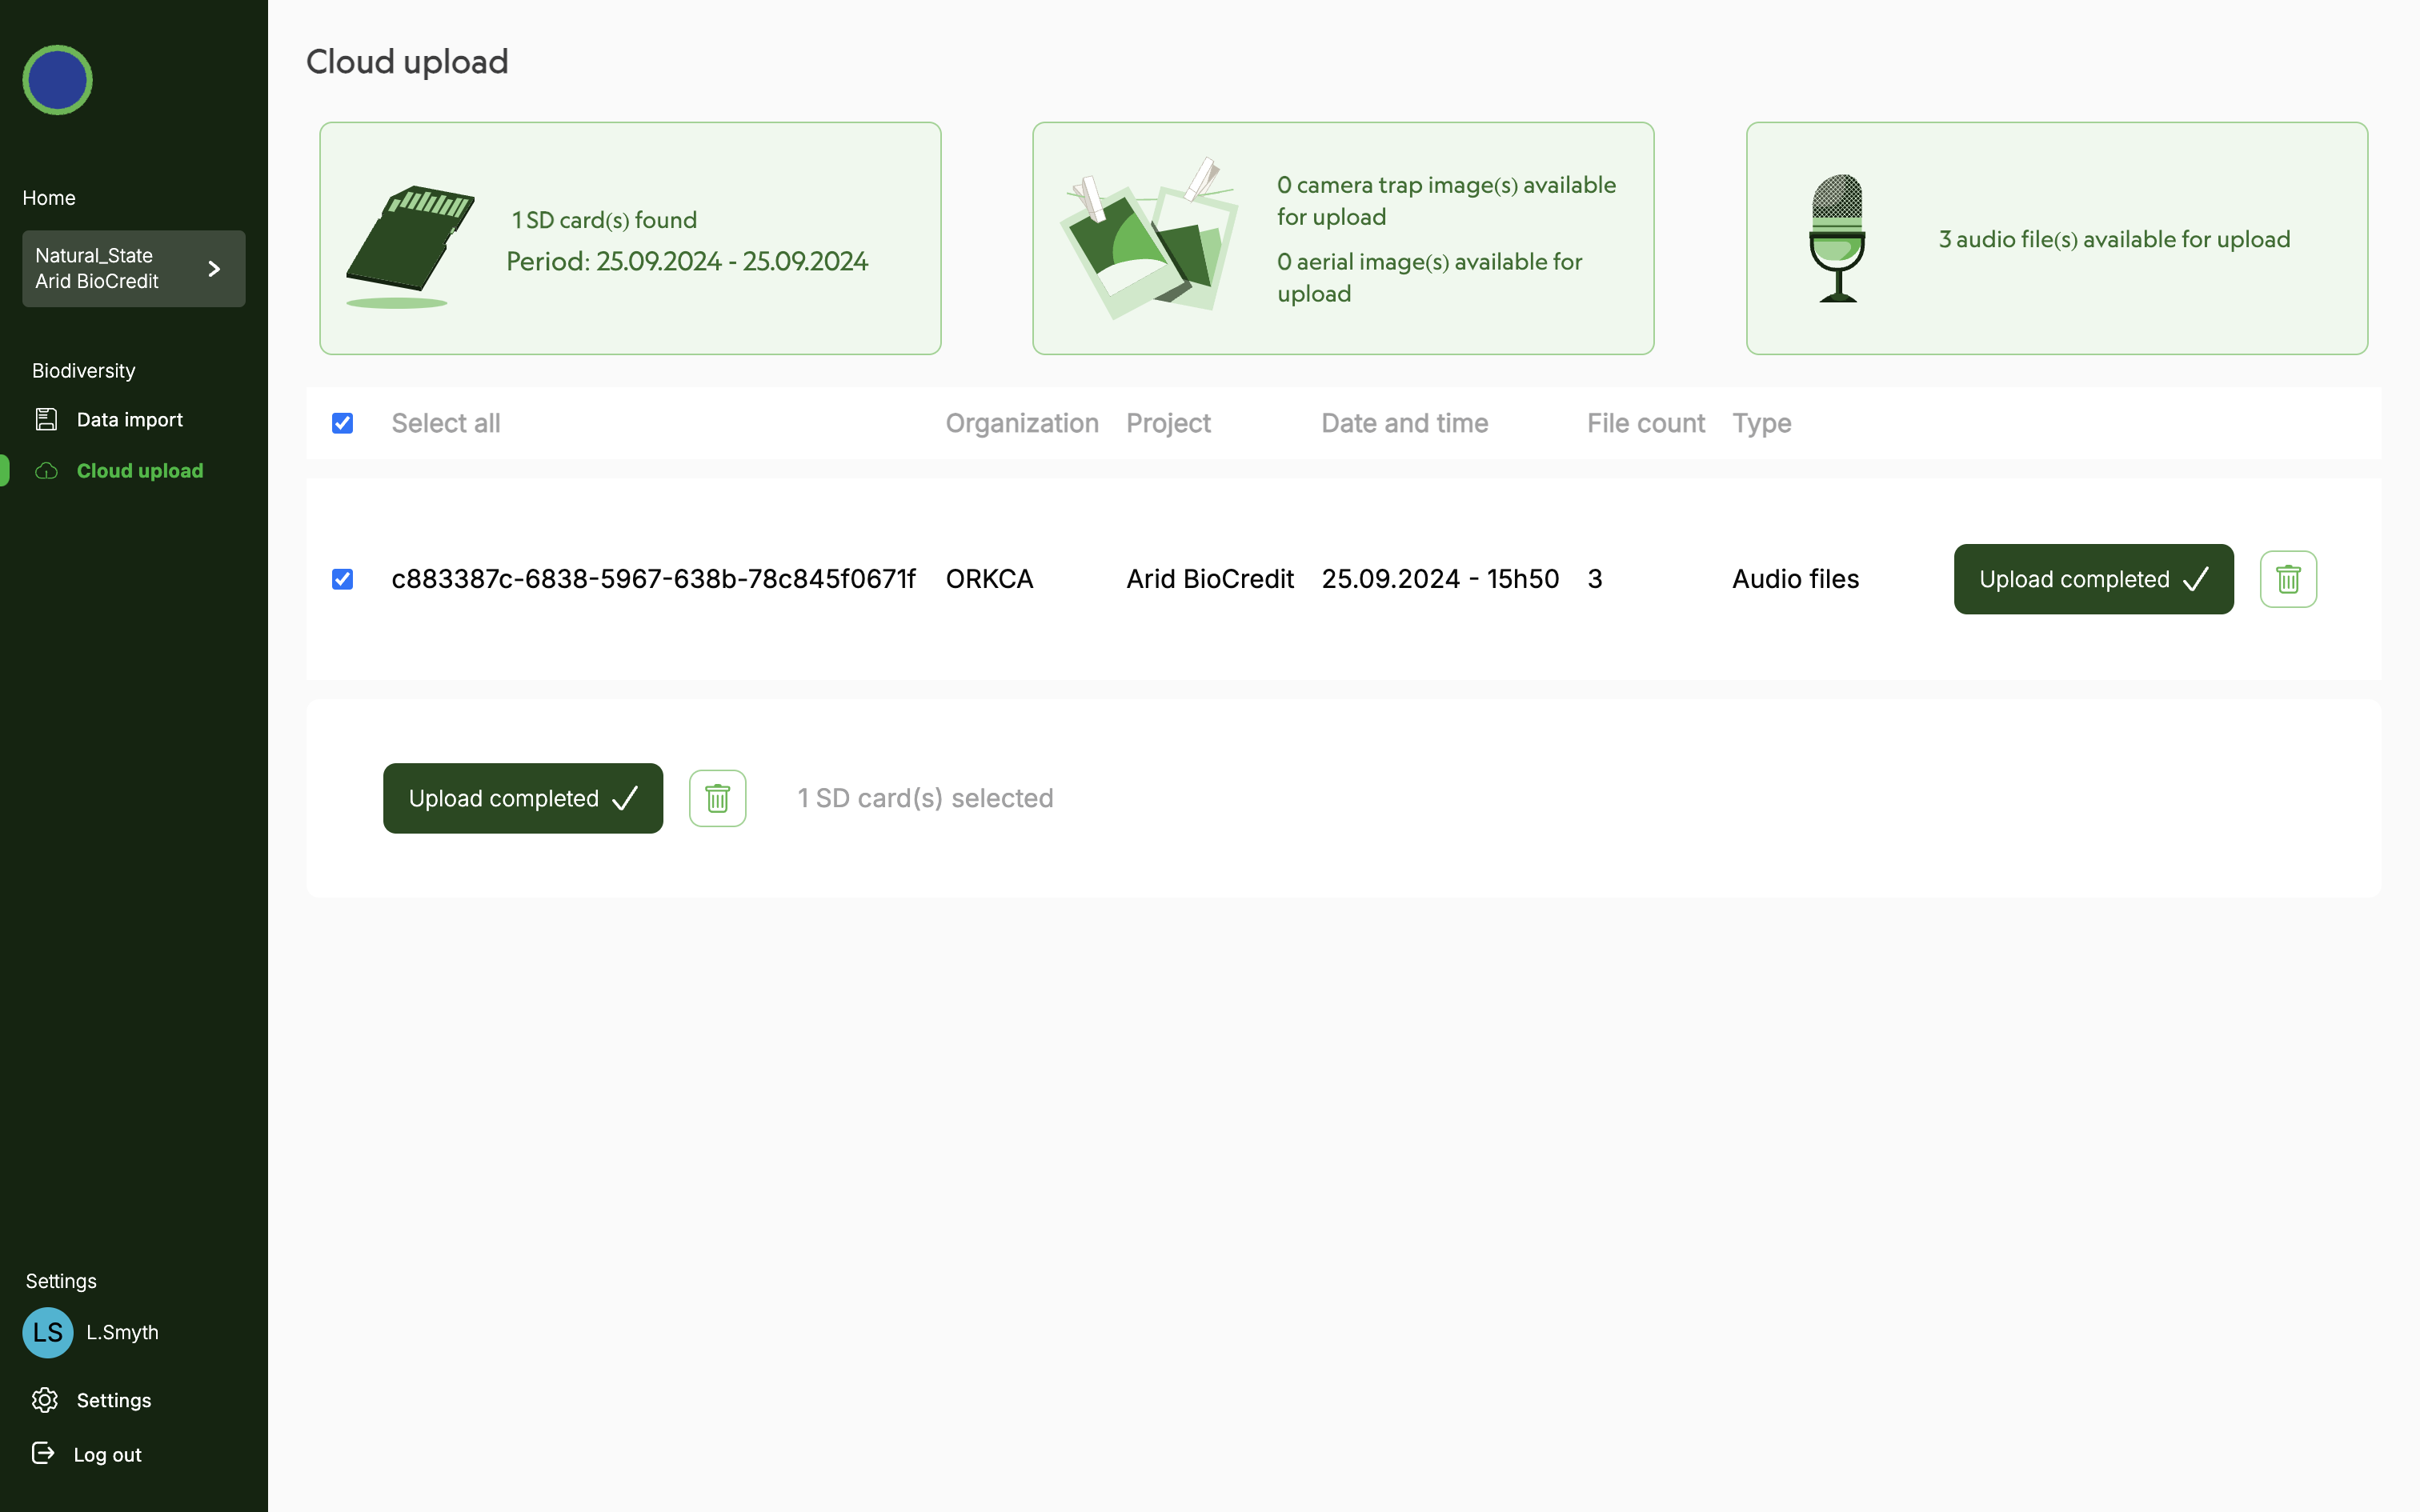 7) When all data has ben uploaded you can close Kutuma. Data will still be stored on your harddrive as an extra backup. Keep it there until asked to remove it by the project PI.
Only once all data has been uploaded to cloud 1) Format each SD card and safely eject from computer. 2) Place SD cards in a clearly labelled box for clean, formatted SD cards. Close the box! 3) Now they are ready for use again.
7. RELATED DOCUMENTS
7.1 DESIGN DOCUMENTS
7.2 OTHER RELEVANT SOPS
7.3 DATA ELEMENTS
8. REVISION AND VERSION HISTORY AND DESCRIPTION
==XXX==
9. SIGNATURES OF CONFIRMATION
Principal Investigator: ______________ Date: ___________
Director of Impact Monitoring: ____________ Date: ___________
10. APPENDICES
None currently available